
Installation and user guide
An awning, a step or a bed, from the screen
The Motor Driver is a small add-on that lets a SavvyVan3 open and close one motorised mechanism - an awning, a step, a drop-down bed, a pop-top or a side pod - with a tap on the screen. It is sold to trade, it needs panel software 2.5.1 or later, and this guide covers fitting it, setting it up and using it.
At a glance
- Sold to
- Trade only
- Drives
- One 12V DC motor that reverses with its polarity and stops itself at each end
- Supply
- 12V
- Motor current
- Up to 5A
- Lockout
- An input that stops the motor - a sensor, or linked out if you do not need one
- Set up in
- Installer Settings → second screen → Motor Driver
- Used from
- The side menu → Motor Driver
What it does
The Motor Driver sits between the van’s 12V supply and one motor, and the panel talks to it over wireless. Once it is set up, the owner opens Motor Driver from the side menu and taps Open or Close: the motor runs the mechanism all the way, and stops. Stop, in red, stops it at any point.
It runs the motor for a set time - the time the mechanism takes to travel from one end to the other, which it measures for itself when you calibrate it - and it watches the motor’s current the whole way, stopping early if the current rises past a limit, which is what an obstruction looks like. The motor’s own limit switches stop the mechanism at each end.
What you need
- A 12V DC motor or linear actuator with its own limit switches. Two wires, running one way or the other depending on which is positive, and stopping itself at each end of its travel. Three-wire motors are not supported yet.
- A motor current of up to 5A.
- A 12V supply, fused near the battery to suit the motor and the cable.
- A lockout, if you want one - a sensor that stops the motor, such as an awning’s travel cage being in place or a bedroom door being open. Ask us which sensor to use. Without one, a link between two terminals does instead.
- A SavvyVan3 on software 2.5.1 or later, within wireless range.
Wiring it
Eight screw terminals run along one edge of the board, labelled on the board itself:
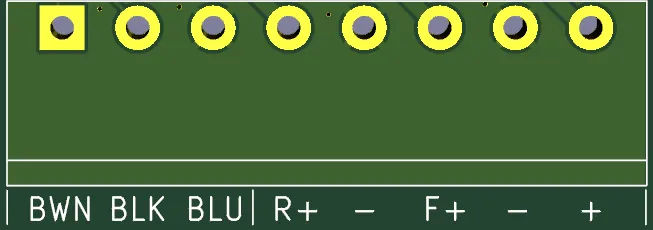
| Terminal | Connect |
|---|---|
| BWN | The lockout sensor’s supply (+). It is battery voltage out, for a sensor and nothing else |
| BLK | The lockout sensor’s signal |
| BLU | The lockout sensor’s 0V (-) |
| R+ | One of the motor’s or actuator’s two wires |
| - (the middle one) | Nothing, for a two-wire motor |
| F+ | Its other wire |
| - (second from the right) | Supply negative |
| + | Supply positive, 12V, fused |
- The supply. 12V to + and - on the right, through a fuse near the battery that suits the motor and the cable. Connect the supply last, once everything else is wired.
- The motor or actuator across F+ and R+ - its two wires, one to each. Open makes F+ positive; Close makes R+ positive. If Open turns out to close the mechanism, swap the two wires and calibrate again.
- The lockout - one of these:
- A sensor: brown to BWN, black to BLK, blue to BLU.
- No lockout: a link from BLK to BLU.
The lockout
The lockout is an input that, while it is engaged, stops the motor where it is and refuses Open, Close and calibration. Which way round it works is set on the panel, as Lockout:
- Active on Contact - the lockout is engaged while the sensor detects what it is watching. For example, an awning’s travel cage: cage in place, the awning cannot move.
- Active on Separation - the lockout is engaged while the sensor does not detect it. For example, a drop-down bed and the bedroom door: door open, the bed cannot move.
With the BLK to BLU link and no sensor, choose Active on Separation.
Pairing it
Power the Motor Driver. Its light flashes blue while it waits for the panel.
- Open Installer Settings, enter the installer passcode, and tap the pairing page - the last icon on the first screen.
- Tap Scan. The Motor Driver appears as MotorDvr_V2.
- Tap the + beside it. It joins the list of paired devices on the left, and its light goes steady blue.
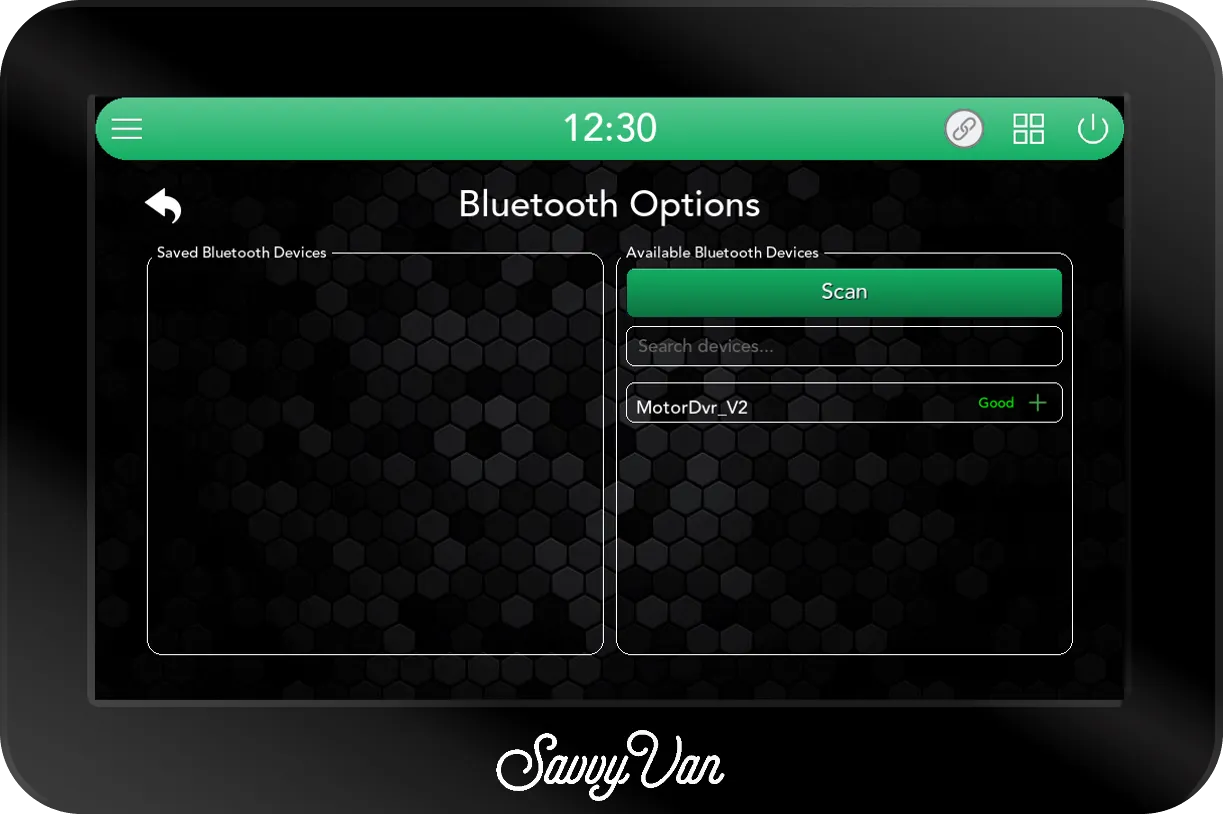
As soon as it is paired, Motor Driver appears in the panel’s side menu, for the owner. It stays there, reading Disconnected, if the Motor Driver loses power or goes out of range.
Setting it up
Open Installer Settings, tap Next, and tap Motor Driver - the first icon on the second screen. The page is headed Motor Driver Settings. With nothing paired it says so, and points you to the pairing page.
The first time you open it with a Motor Driver paired, it puts up a reminder to read first:
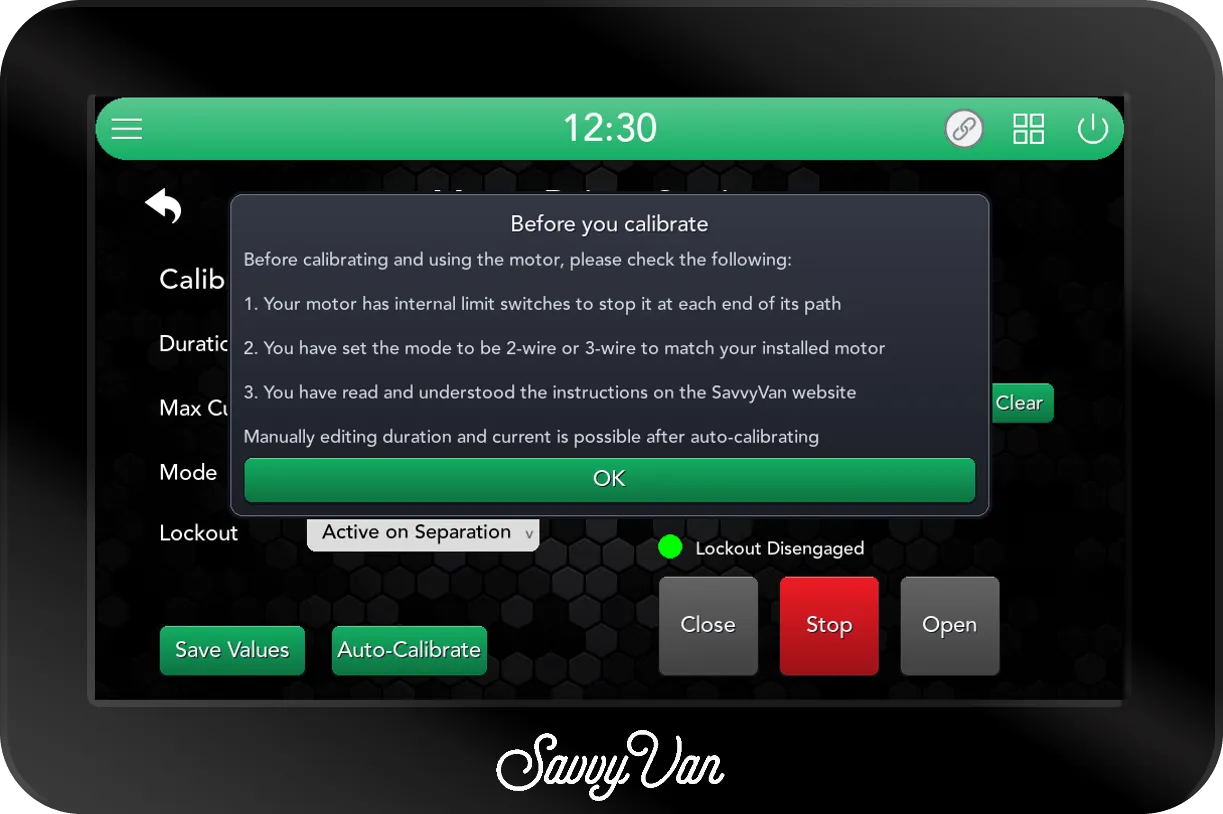
Tap OK. The page has two halves:
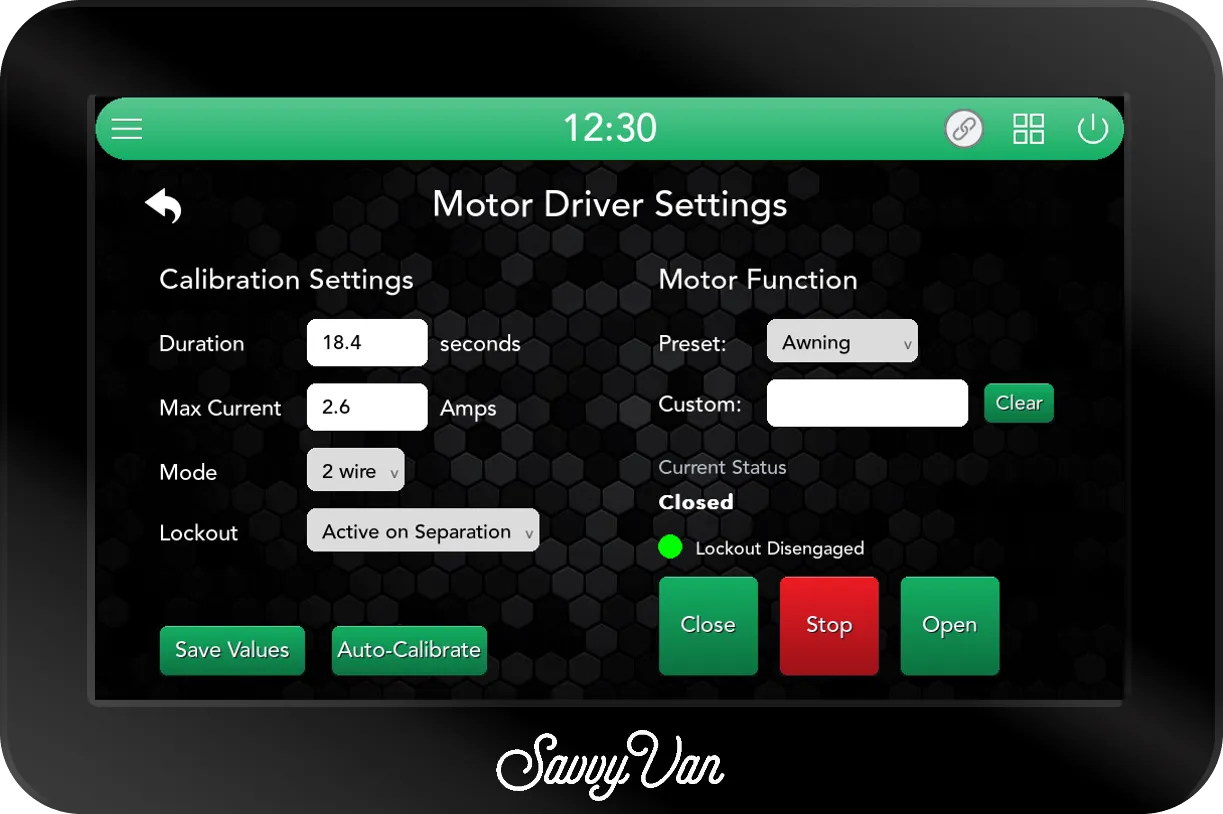
Calibration Settings, on the left:
- Duration - how long, in seconds, the motor runs for one full opening or closing. Measured by calibrating.
- Max Current - the current, in Amps, above which the Motor Driver stops the motor early. Measured by calibrating.
- Mode - choose 2 wire. (3 wire is listed, and is not supported yet.)
- Lockout - Active on Contact or Active on Separation, to match how you wired it. With the BLK to BLU link, Active on Separation.
- Save Values sends all four to the Motor Driver. Nothing changes on the Motor Driver until you press it, and it wants all four set - otherwise it says Set a duration, a max current, a mode and a lockout first.
Each box shows -- until the Motor Driver has reported its settings, which it
does every few seconds. Duration and Max Current are greyed out until it
has been calibrated - they cannot be typed in before then.
Set Mode and Lockout now and press Save Values. The Motor Driver answers OK: Config updated.
Motor Function, on the right, is what the owner’s page calls the mechanism - see Naming it - and under it are the same Current Status, lockout light and Close, Stop and Open the owner has, for testing.
Calibrating it
Calibrating is how the Motor Driver learns how long the mechanism takes to travel and how much current it normally draws. It has to be done before the motor can be used, and again whenever the motor or the mechanism changes.
-
Check the lockout is clear - the light beside Lockout Disengaged is green. A calibration with the lockout engaged is refused.
-
Tap Auto-Calibrate. A box explains what is about to happen:
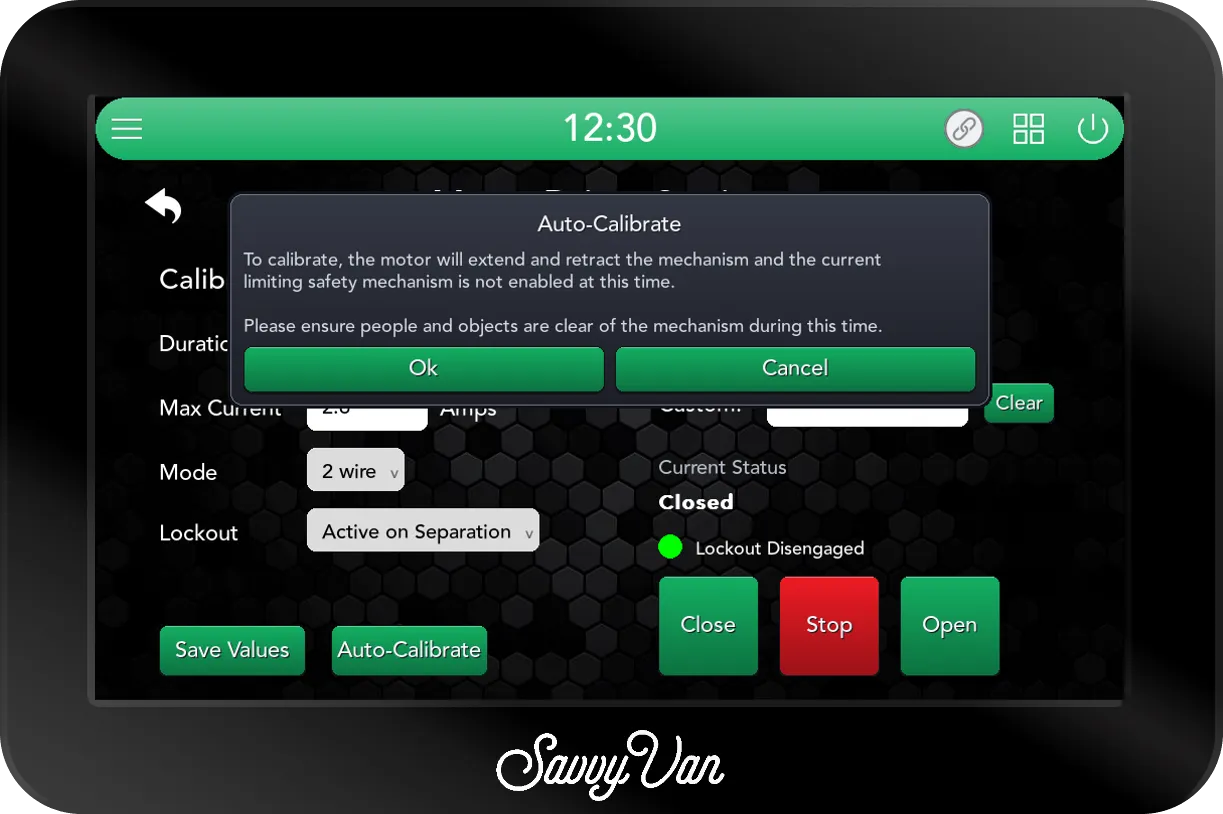
Auto-Calibrate asks every time. Ok starts it; Cancel leaves everything as it was. -
Tap Ok. The button reads Calibrating… and the status reads Moving. The Motor Driver opens the mechanism until the motor’s limit switch stops it, pauses, then closes it the same way. Each direction can take up to a minute.
-
When it finishes, the panel says OK: Calibrated, the status reads Closed, and Duration and Max Current fill in with what was measured: the longer of the two travel times plus half a second, and the highest current plus a tenth of an amp.
Stop cancels a calibration at any point; the Motor Driver is then not calibrated. If it fails, the panel says ERR: Cal failed - see Troubleshooting. A mechanism that takes much more than 55 seconds to travel one way cannot be calibrated.
Adjusting Duration and Max Current
Once it is calibrated, Duration and Max Current turn white and can be changed: tap one, type a number on the keyboard - Enter the travel duration in seconds. or Enter the maximum current in Amps. - tap Save, then Save Values. Each must be a number greater than nought.
Leave Max Current a little above what calibration measured, so the motor stops early on an obstruction but not on an ordinary run, and never above 5A. If the motor keeps stopping part way with Maximum current exceeded, look for what is in its way before raising it.
Naming it
Under Motor Function, tell the panel what the motor drives. The owner sees it on their page as Controlling:.
- Preset: - Awning, Bed, Generic, Pop-Top, Side Pod, Step or Unspecified.
- Custom: - tap the box and type your own, such as Rear awning. A custom name is shown instead of the preset. Clear empties it.
The name is saved on the panel when you leave the page.
Using it
Open the side menu and tap Motor Driver. It is only there once a Motor Driver has been paired.
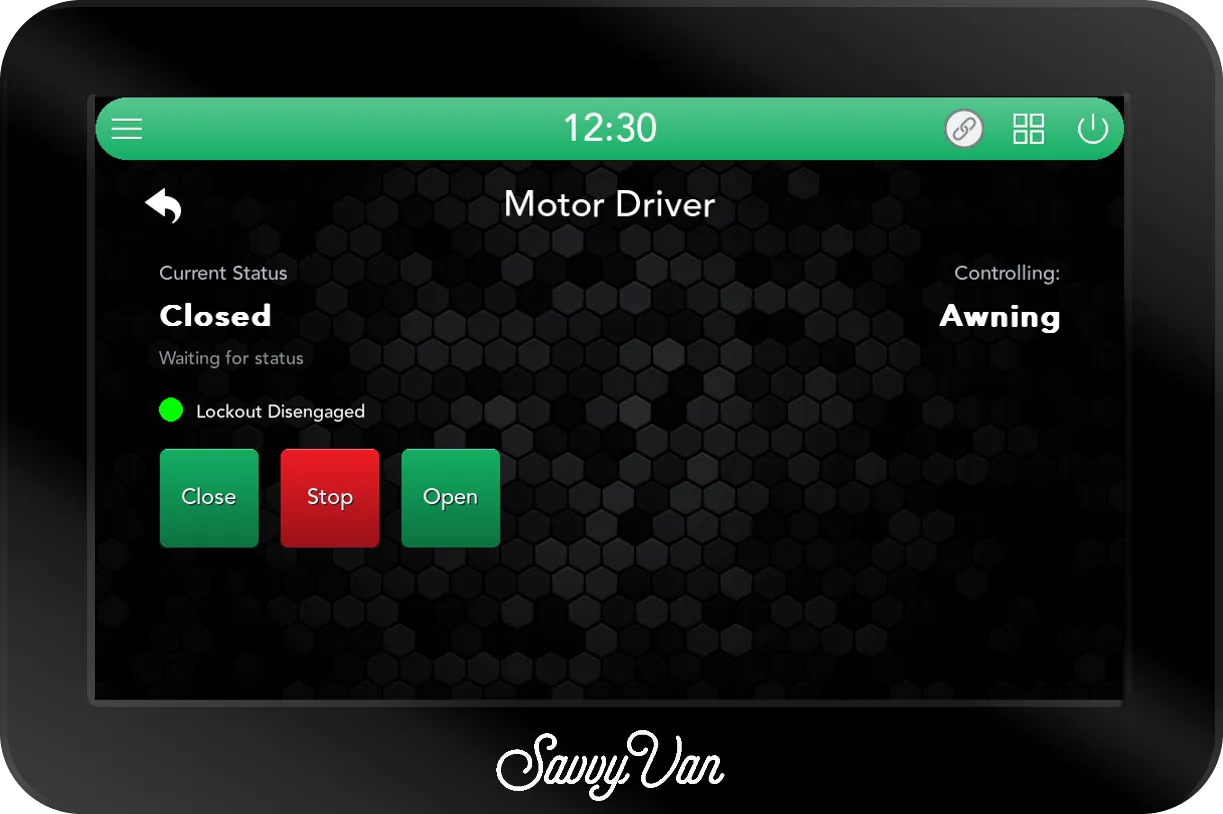
- Open and Close run the mechanism all the way. One tap is enough - it stops by itself at the end, with a rising chime from the Motor Driver.
- Stop, in red, stops it at any point. It is never greyed out.
- Current Status says where it is or what it is doing:
| Shown | Means |
|---|---|
| Opening / Closing | Running that way |
| Moving | Running, and the panel does not know which way - while it calibrates, for example |
| Fully open / Closed | It ran all the way to that end |
| Partly open | It stopped part way - for Stop, the lockout, the current limit, or the connection dropping |
| Position unknown | It has not run since it was set up |
| Disconnected | The panel cannot reach the Motor Driver |
- The grey line under the status shows the Motor Driver’s own last message, word for word - OK: Stopped - travel complete, for example, or ERR: Lockout active. It reads Waiting for status until there is something new to say.
- The lockout light is green with Lockout Disengaged and red with Lockout Engaged. While it is red, Open and Close are greyed out.
- Controlling: shows what the installer named it.
Open and Close are also greyed out while it is moving, while the panel cannot reach the Motor Driver, and until it has been calibrated. Before it is calibrated, the page says so each time it is opened:
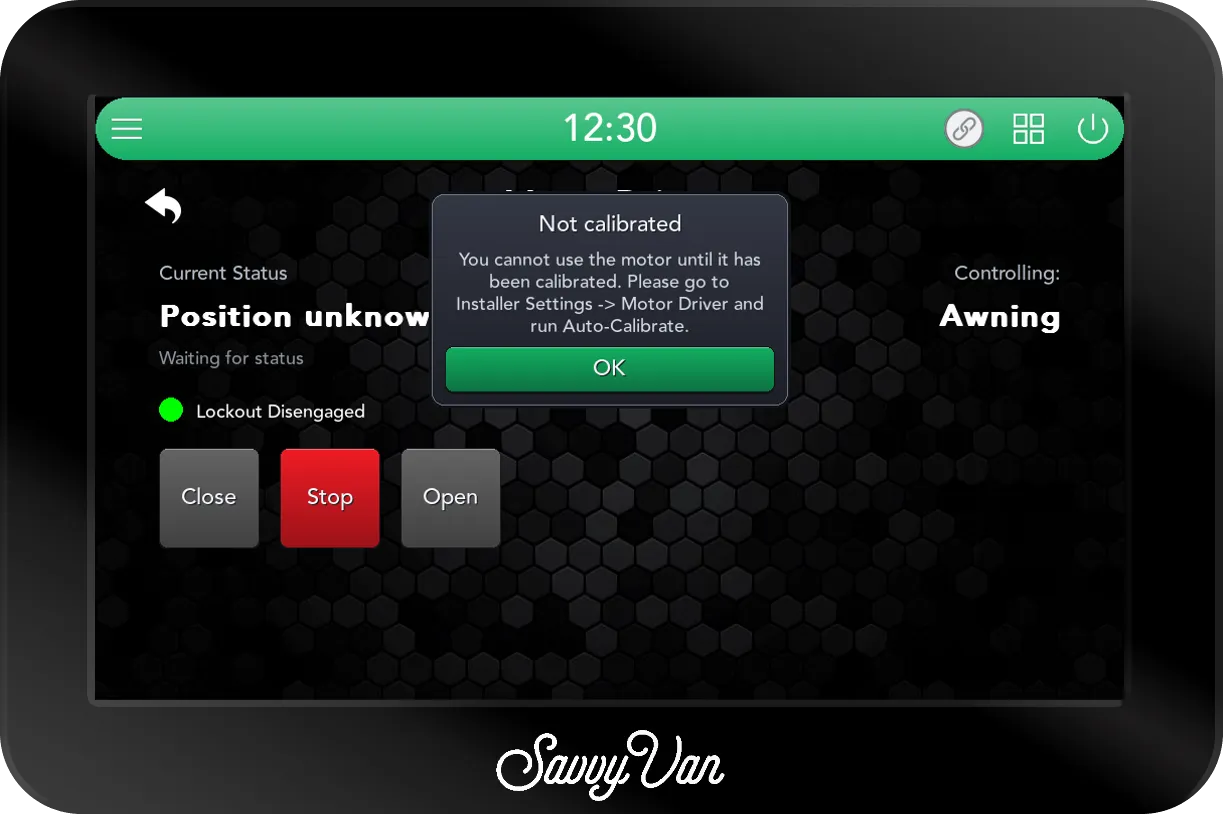
If something stops it part way, the panel tells you on whatever page it is showing:
- Maximum current exceeded - check structure for obstructions - it met more resistance than usual. Look for what is in the way before you try again.
- A message that the connection to the Motor Driver was lost - it stops the motor when the panel loses touch, rather than running on unwatched.
The screen remembers where the mechanism was left, even after the panel restarts. If it was moved by hand, or stopped part way by a power cut, the status may not match what you see - run it fully open or closed once and it catches up.
The light and the beeps
| The Motor Driver’s light | Means |
|---|---|
| A brief green flash | It has just been powered |
| Flashing blue | Waiting for the panel |
| Steady blue | Connected to the panel |
| Red | It keeps failing to report to the panel. It restarts itself after a while |
It beeps too: a rising chime at the end of a normal run, a short low beep when it is stopped, and a low-high tone when it refuses or stops something - the lockout, the current limit, a fault or a lost connection.
Removing or replacing it
Removing MotorDvr_V2 from the paired devices on the pairing page clears everything the panel knew about it - its name, its position and its calibration - and takes Motor Driver off the side menu. A replacement is paired, set up and calibrated from the start.
Troubleshooting
Open and Close are greyed out. The lockout is engaged (red light), the motor is already moving, the panel cannot reach the Motor Driver, or it has not been calibrated. Stop always works.
It says Lockout Engaged with no sensor fitted. The lockout terminals are empty. Link BLK to BLU and set Lockout to Active on Separation, then Save Values.
Open closes it. The motor wires are the wrong way round. Swap the wires on F+ and R+, then calibrate again.
Calibration fails - ERR: Cal failed. Check, in order:
- The lockout was clear - a calibration with it engaged is refused.
- The motor is wired to F+ and R+ and moves when it is meant to.
- The mechanism reaches each end within about 55 seconds, and the motor’s limit switches stop it there.
- Nothing stopped it - Stop cancels a calibration.
It stops part way with Maximum current exceeded. Something is in the way, or the mechanism has got stiffer. Clear it and try again. If it still stops, calibrate again; only raise Max Current by hand if you are sure nothing is wrong, and never above 5A.
It pairs but the page never shows a status. The Motor Driver needs its current software to work with panel 2.5.1. Get in touch with its details and we will sort it out.
The status does not match where it is. It was moved by hand or stopped by a power cut. Run it fully open or closed once.
Warranty
The Motor Driver is covered for 12 months. See the warranty.
Questions people ask
- Can the panel open and close an electric awning?
- Yes, with a Motor Driver fitted between the van's 12V and the awning's motor. The same goes for an electric step, a drop-down bed, a pop-top or a side pod - one per panel. The owner opens and closes it from Motor Driver in the panel's side menu.
- Will it work with any motor?
- It needs a 12V DC motor that runs one way or the other depending on which of its two wires is positive, and that has its own limit switches to stop it at each end of its travel - as the panel reminds you before you calibrate. The Motor Driver has no sensor of its own for where the mechanism is: it runs the motor for the time it measured when it was calibrated, and relies on the motor to stop itself. Three-wire motors are not supported yet.
- Do I have to fit a lockout?
- No. If you do not want one, link BLK to BLU and set Lockout to Active on Separation. What you cannot do is leave those terminals empty: the Motor Driver reads nothing connected as the lockout being engaged, and the motor will not move.
- Can the phone app, a SavvyDot or a logic rule open it?
- No. It is driven from the panel's own Motor Driver page, which the owner opens from the side menu, and from the installer's setup page.
- How many Motor Drivers can one panel have?
- One. The panel drives whatever Motor Driver is paired to it as one mechanism, so pair one per panel.
- Is it a safety device?
- No. It stops the motor on its lockout, on its current limit and when you press Stop, but none of that replaces somebody watching the mechanism while it moves. Keep people and things clear of it.