
User guide
Using SavvyVan3
Everything on the panel, explained in the order you are likely to need it. The system is modular, so yours may not have all of this - if a section describes something you have not got, it is an add-on rather than a fault.
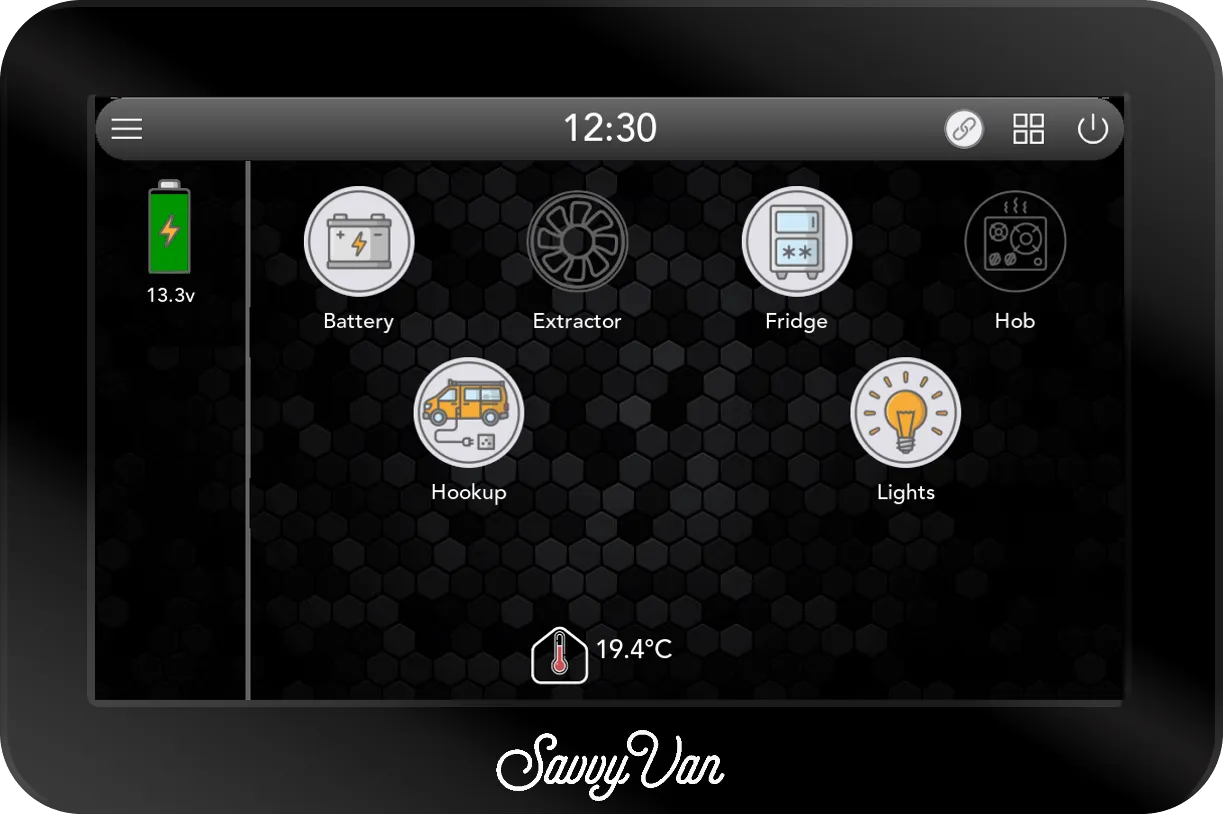
At a glance
- Home
- The four squares, top right, from any screen
- Menu
- Top left - WiFi, settings, and everything else
- Sleep
- 2 min at night, 2 hours by day - both changeable, or Never
- Passcode
- 123456 by default, for User Settings
- Notifications
- The menu, top left - 30 seconds on screen, then stored
- WiFi
- Needed for the clock, weather and updates. Prefer 2.4GHz for range
Waking it up
Tap the screen. It may take a two to three seconds - that is normal.
The panel has a day and a night mode, and the only difference is how quickly the screen goes dark. Everything keeps running either way: switches stay as you left them, the heating carries on, the shunt keeps counting.
| Screen sleeps after | |
|---|---|
| Day, 7am–8pm | 2 hours without a touch |
| Night, 8pm–7am | 2 minutes without a touch |
At night, waking it gives you two minutes before it sleeps again. After 7am the first touch returns it to day behaviour.
Those are starting values - both are yours to change. Settings → Display & Sound has a Day Screen Timeout and a Night Screen Timeout. Set either to anything from a second to a full day, or to Never to leave the screen on.
The screen is the thirstiest part of the panel, so Never on an off-grid van is a decision rather than a preference. On hook-up it costs you nothing.
To put the screen to sleep yourself, tap the power icon, top right. It turns the display off and nothing else - every switch stays as it was, and a touch wakes it again.
The main screen
The home button - the four squares, top right - brings you back here from anywhere in the system.
Tapping a switch turns that appliance on or off. Off is a white outline; on fills with colour. That is the whole language of the main screen.

Battery
Every panel has a built-in voltage sensor. Some have a SavvyShunt or a battery that reports itself, and those show more.
Voltage only
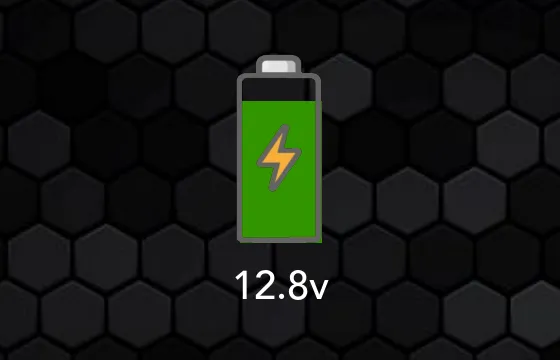
- The figure is the battery’s voltage, such as 12.8v. It updates every few seconds.
- The fill rises and changes colour with it: empty and red at 11 volts, orange around 12, and full and green from 13 volts up.
- The lightning bolt is part of the picture. It is always there, and does not mean the battery is charging.
That is a good guide on a lead acid battery. On lithium it tells you less, because a lithium battery’s voltage barely moves until it is nearly empty - so the dial can sit on full green for most of the day.
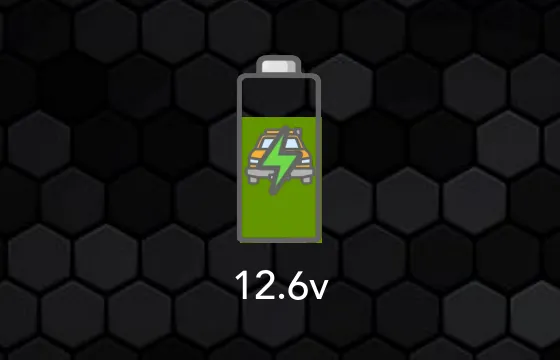
A second dial, with a van drawn on it, is a second battery - usually the starter battery, so you can see whether the van will start in the morning, which the leisure battery tells you nothing about. It reads the same way, in volts, and you only have it if a second battery was connected to the panel.
Low voltage cut-off
A panel can be set up to switch circuits off on its own before the battery goes flat. If yours does, the panel says so:
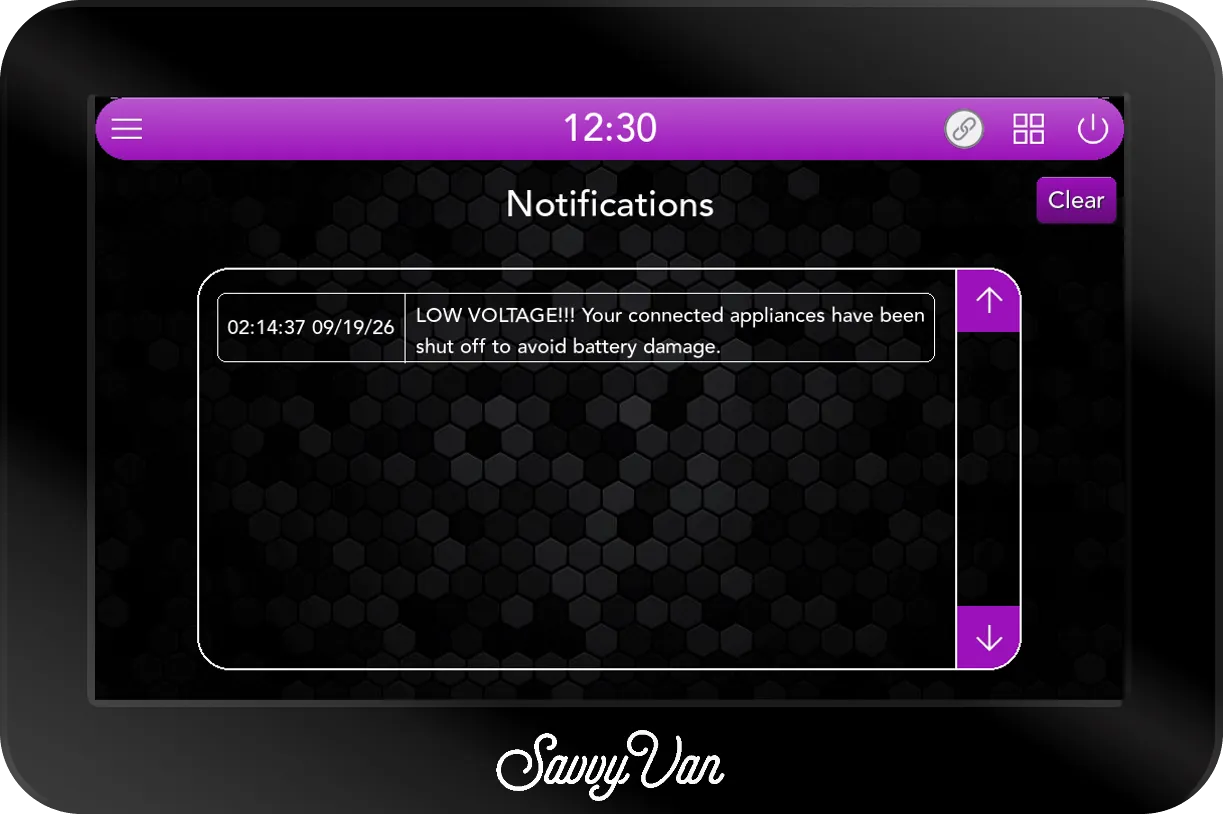
LOW VOLTAGE!!! Your connected appliances have been shut off to avoid battery damage.
That shows on screen for 30 seconds, and stays in the notifications - so if the screen was asleep at the time, that is where you will find it. The circuits it switched off show as off on the main screen. Charge the battery before switching them back on.
Full battery management
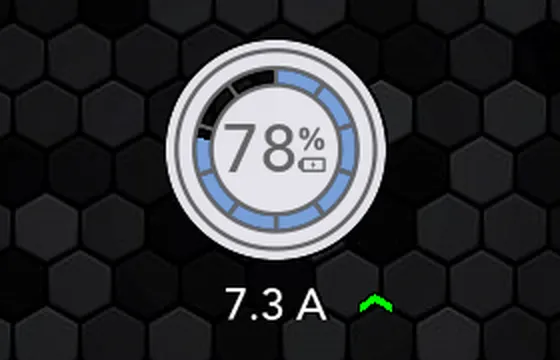
- The percentage is the charge remaining, with the ring as a visual.
- A green arrow up means current is going into the battery.
- A red arrow down means it is coming out.
Tap it for the full picture.
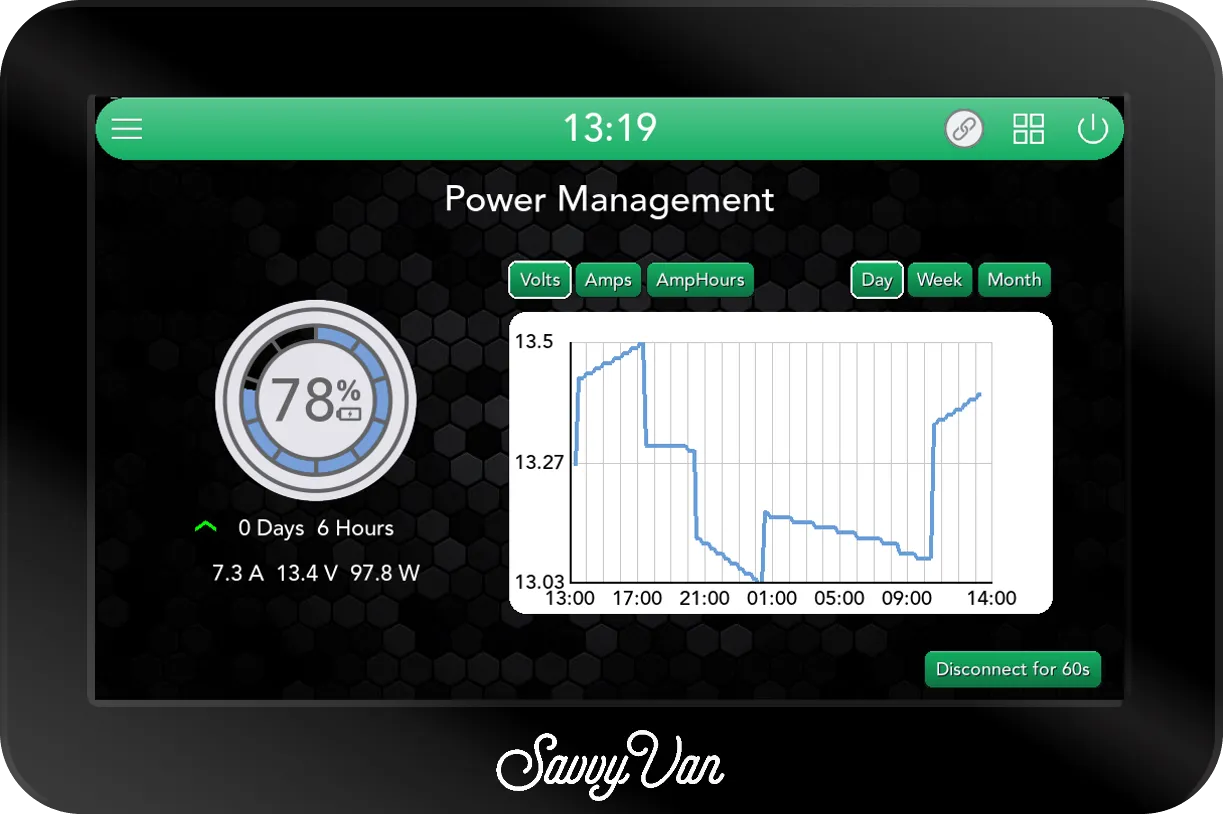
Time to charge or discharge comes from what you are using at that moment, so it moves as you switch things on and off. Current, voltage and watts refresh every 10 seconds.
Running on the voltage sensor and want this? A SavvyShunt adds it - or, with one of the batteries we read directly, the panel takes it from the battery with no shunt at all.
History goes back 30 days, by day, week or month.
Tanks
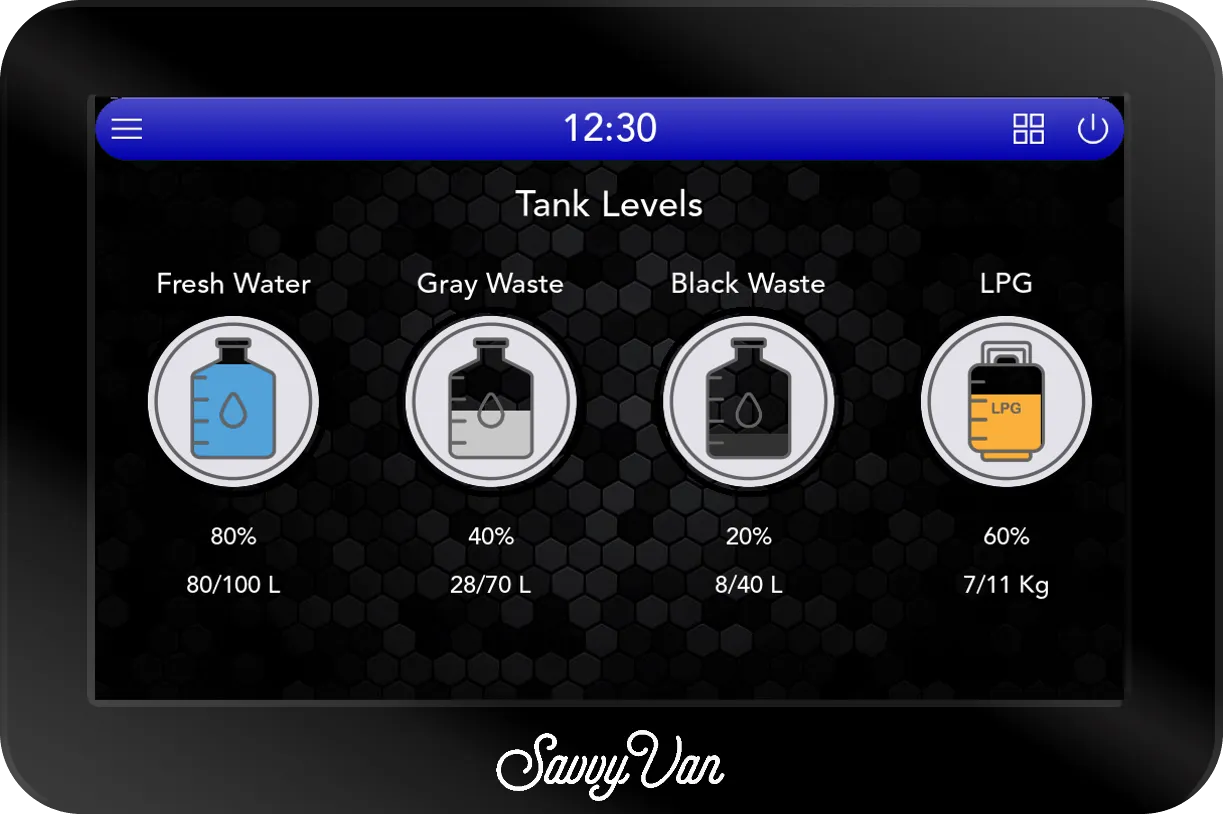
With SavvyTanks fitted, your tank levels sit on the main screen. With more than one tank configured they take turns every 5 seconds. A red ring around a tank means its relay is active.
Tap the tank icon for the full page, where every tank is visible at once. To toggle a configured tank - a gas solenoid, say, or a drain valve - tap it.
Levelling
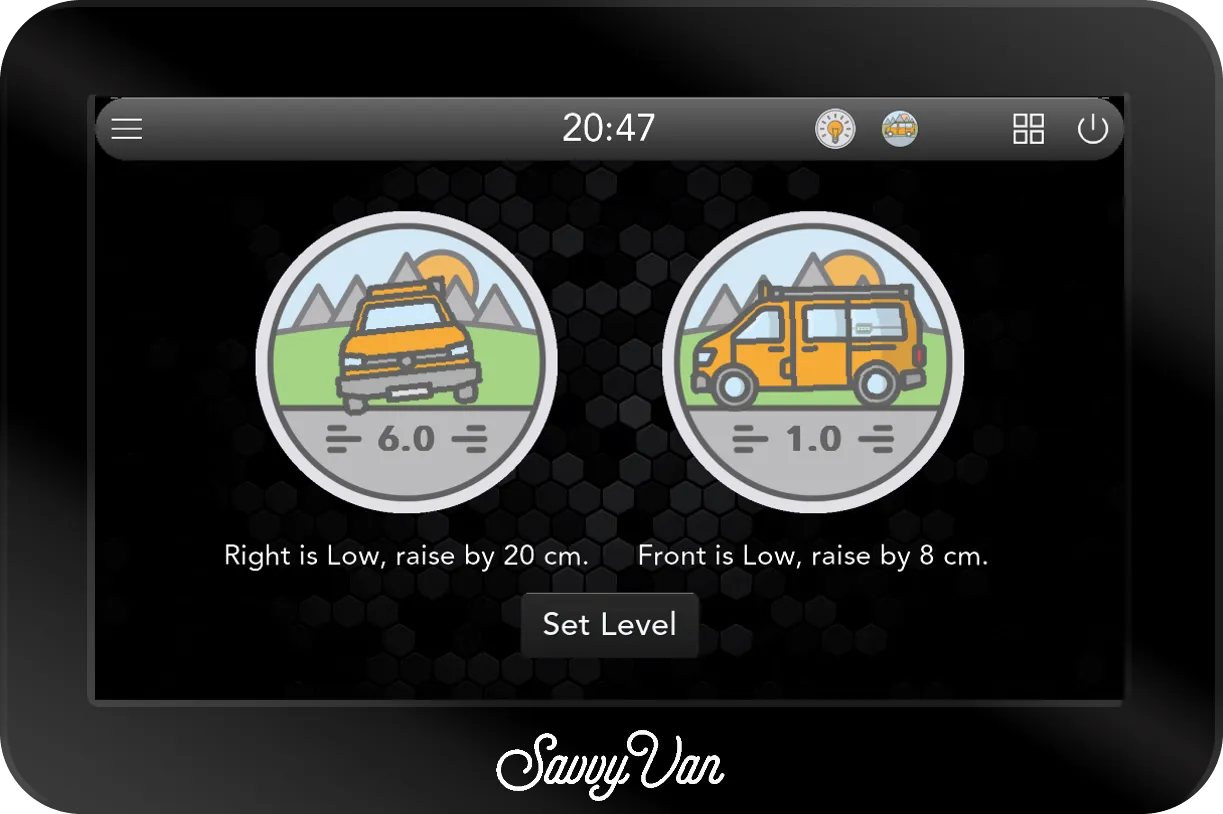
With SavvyStance fitted, a levelling button appears along the top of the screen. Everything is on that one page - nothing to set, nothing to zero, unless you want to set your own idea of level.
WiFi
WiFi is needed for the clock, the weather widget and updates; everything else works without it. Use the 2.4GHz band where you have the choice - it reaches further than 5GHz, and range is this panel’s weak point, not speed.
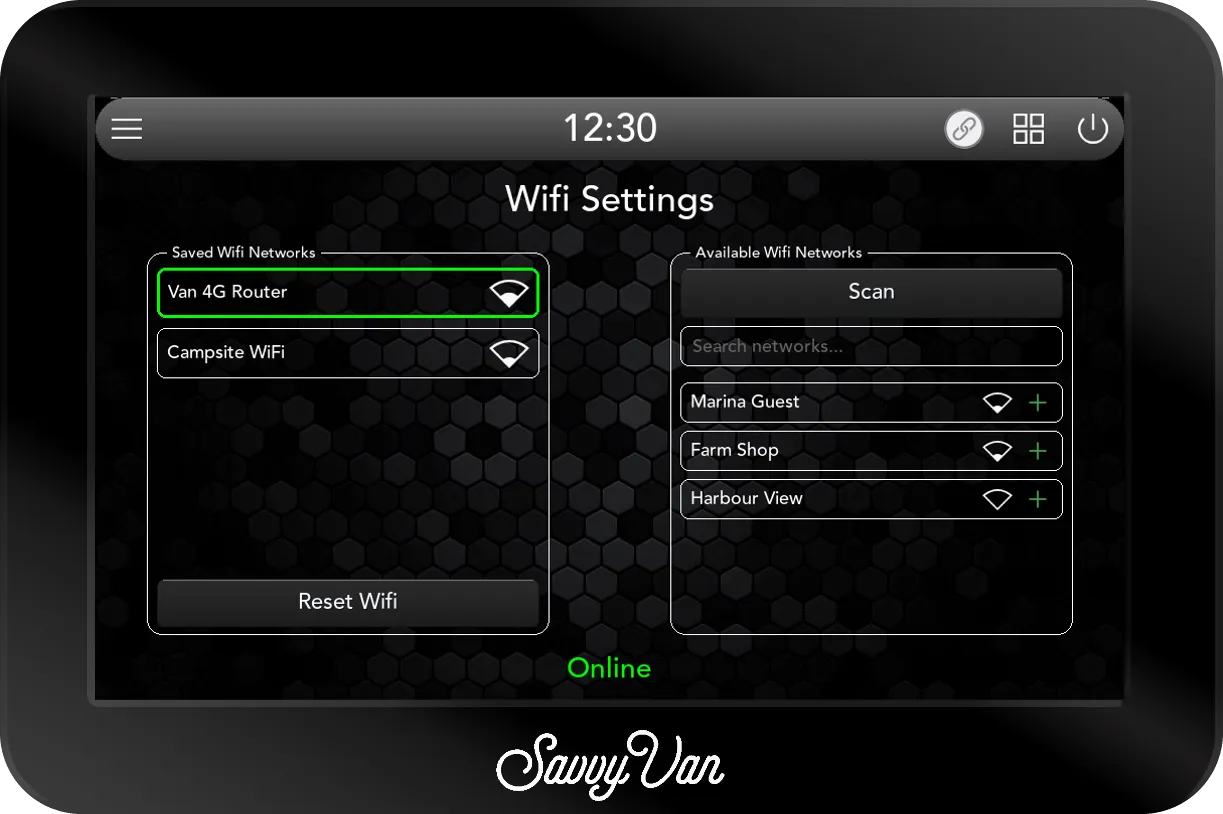
- Tap the menu top-left and select Wifi. The page looks for networks as it opens, and Scan looks again.
- Under Available Wifi Networks, tap your network - the one with the green + beside it. With a long list, Search networks… narrows it down.
- Enter the password and tap Save.
It joins after a few moments and moves across to Saved Wifi Networks, where the network it is connected to has a green border. The foot of the page says Online in green once it reaches the internet, Wifi Connected - No Internet in orange when it is on a network that is not getting out, and Offline in red when it is not connected. To forget a network, tap it under Saved Wifi Networks and choose Delete.
Will not connect, or will not stay connected? Troubleshooting, at the bottom of this guide, covers it - signal, iPhone hotspots and the Reset Wifi button.
Starlink
If your van has a Starlink dish and your panel has the Starlink page, Starlink is in the side menu, under WiFi. A dish but no page? Ask whoever fitted the panel.
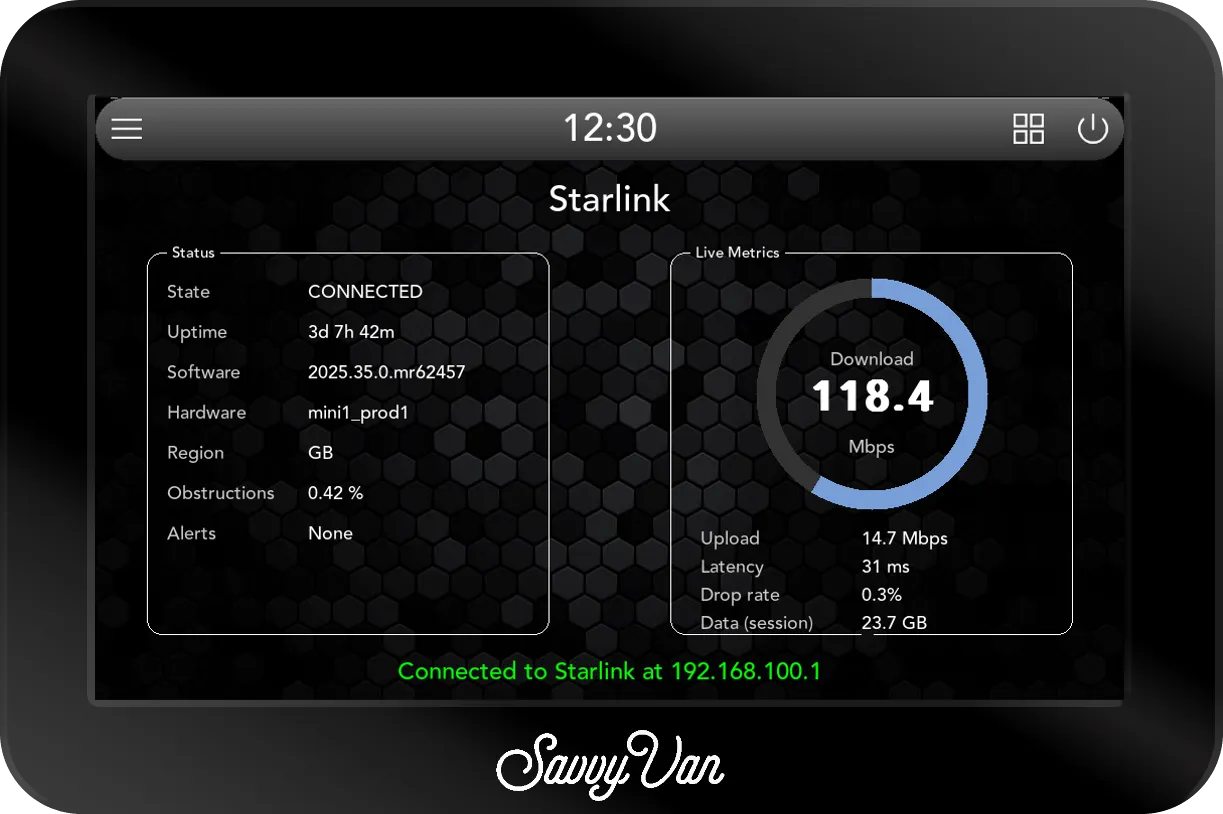
Status, on the left, is the dish itself:
- State - CONNECTED when all is well. Otherwise the dish’s own reason it is not, such as BOOTING or OBSTRUCTED.
- Uptime - how long the dish has been running. If it keeps starting again from nothing, the dish is losing power rather than signal.
- Software and Hardware - the dish’s versions. Worth having to hand if you contact Starlink.
- Region - the country the dish thinks it is in.
- Obstructions - how much of the dish’s view of the sky is blocked, as a percentage. The closer to 0.00 % the better; a tree is the usual culprit.
- Alerts - None, or whatever the dish is flagging.
Live Metrics, on the right, is the connection:
- Download - the dial, in megabits a second: how fast data is coming in right now. It shows what you are using, not the most you could get, so it reads low when nobody is online.
- Upload - the same, going out.
- Latency - how long a message takes to reach Starlink’s network and come back, in milliseconds. Lower is better.
- Drop rate - the share of those messages that never come back. It should sit at or near 0%; when it climbs, calls and video start to break up.
- Data (session) - what has gone through the dish since it last started. It is not your monthly allowance - that is only in the Starlink app.
The line along the bottom is green while the panel can reach the dish. Red,
reading Starlink router not reachable, means it cannot, and every figure shows
--. Usually that is the panel on a different WiFi network from the dish -
check the foot of the WiFi page.
Settings
Tap the menu, then User Settings, and enter the passcode - 123456, unless it has been changed for your panel.
The passcode screen has two buttons of its own:
- Send log files sends the panel’s logs to us. It is the quickest way to give us something useful when a fault is hard to describe, and it needs WiFi.
- Restart restarts the panel after a ten-second countdown, without asking first.
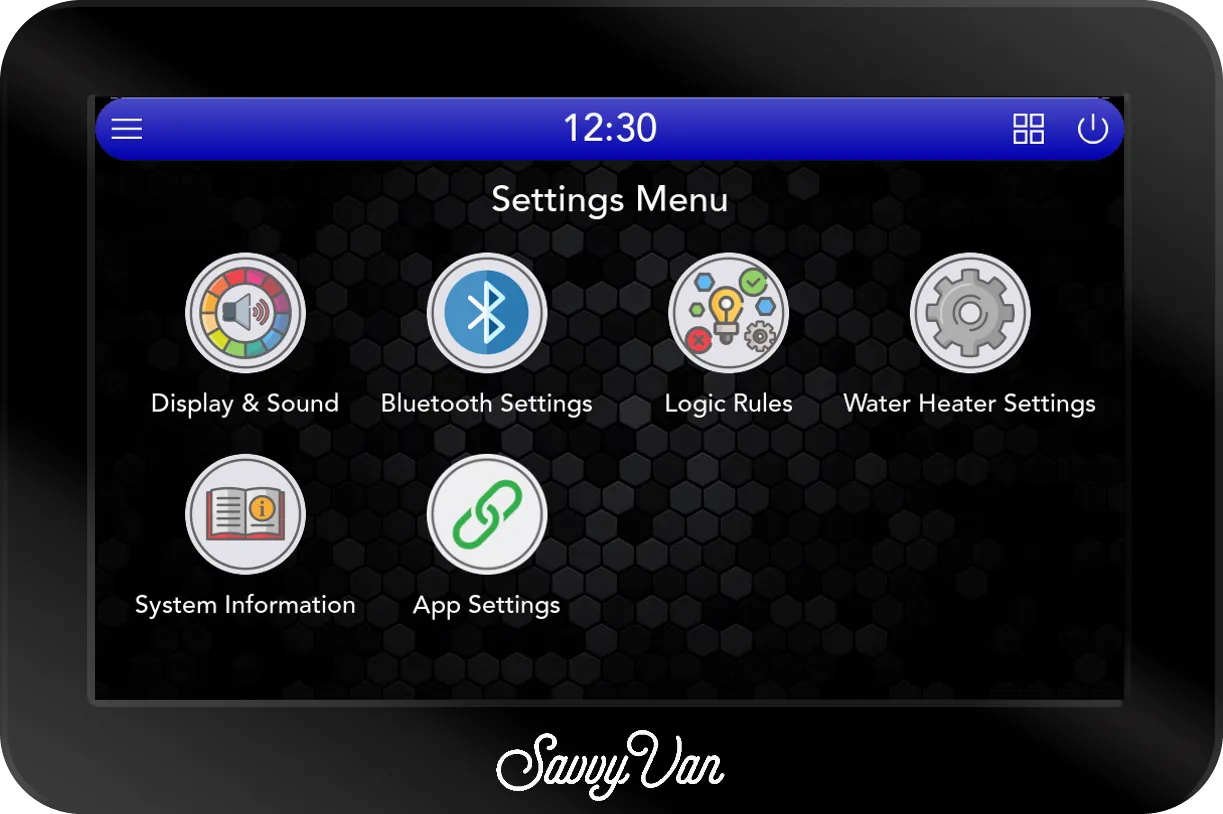
Six pages, each covered in this guide:
| Page | What it is for |
|---|---|
| Display & Sound | Colour, tap sounds, the wake-up screen, the screen timeouts, and the date and time |
| The paired devices page, second in the menu | The add-ons connected to your panel |
| Logic Rules | The rules that switch one tile when another is switched |
| Water Heater Settings | The water heater’s schedule and battery protection |
| System Information | Updates, and your serial number and versions |
| App Settings | Pairing your phone |
Paired devices
The second icon in the menu lists the add-ons connected to your panel - a SavvyShunt, SavvyTanks or a battery, say - with a symbol beside each that turns blue while it is connected. More than six, and the arrows scroll the list.
It is a list to look at: nothing on it can be changed from here. An add-on that is not blue is not talking to the panel, so check it has power.
Logic rules
A logic rule switches one tile for you when another is switched - the extractor coming on with the hob, say. Logic Rules lists the rules on your panel, newest first, and the arrows scroll through them.
A rule acts once, at the moment the first tile is switched. It does not hold the second tile there, so either can still be switched on its own afterwards. Rules cannot be added, changed or removed from this page.
Water heater
If one of your tiles runs a water heater, Water Heater Settings decides when it comes on and what protects the battery. It does nothing if no tile is a water heater.
- Enabled - the switch for everything automatic below. Tapping the water heater’s tile on the main screen works either way.
- Schedule - an On time, in 15-minute steps, and a tick box for each day from Mon to Sun. The heater comes on at that time on the days ticked.
- Auto off delay - Off, 30, 60, 90 or 120 minutes. However the heater came on, by hand or on the schedule, it goes off again that long after.
- Charge Overflow - the heater comes on when the battery reaches 95% and goes off again at 90%, so it spends charge that would otherwise go to waste. Ticking it sets the auto off delay to Off.
- Auto Off - the heater goes off when the battery drops to this, in 5% steps.
Charge Overflow and Auto Off need to know the battery’s percentage, so on a panel that only reads the battery’s voltage they are greyed out and do nothing.
The phone app
App Settings is where you pair the phone app: open the SavvyVan app, choose Pair Device and scan the QR code under Scan to pair your phone. Scan it from inside the app - your phone’s own camera app cannot pair it. It is not a Bluetooth app: it reaches the panel over the internet, so the panel needs to be online. If your panel has a link icon in the top bar, tapping it shows the same code from any screen. The rest of the page:
- App Status - App features disabled, No phone paired, Paired, disconnected or Paired, phone connected, with the link icon beside it in grey, orange or green.
- GroupID - the pairing code the QR code carries.
- Show task tray icon - puts the link icon in the top bar. Leave it ticked: unticking it switches the app off as well, and ticking it again does not switch it back on - that is Enable App Features, in the popup the link icon opens.
- Reset Pairing - asks first, then unlinks every paired phone at once and makes a new pairing code, so each phone has to scan again. The right button when you sell the van; the wrong one for taking one phone off, which is done from that phone.
Everything the app does is in the phone app guide.
Updates
Updates arrive over WiFi and keep adding features to a panel already fitted in your van.
- Check you are connected and Online, with a decent signal.
- Open System Information from the settings menu.
- Tap Update Now.
If there is an update it installs and restarts. The screen may be blank for up to 10 minutes - leave it be. A panel that is not online says Device is offline. Connect to wifi to update. instead.
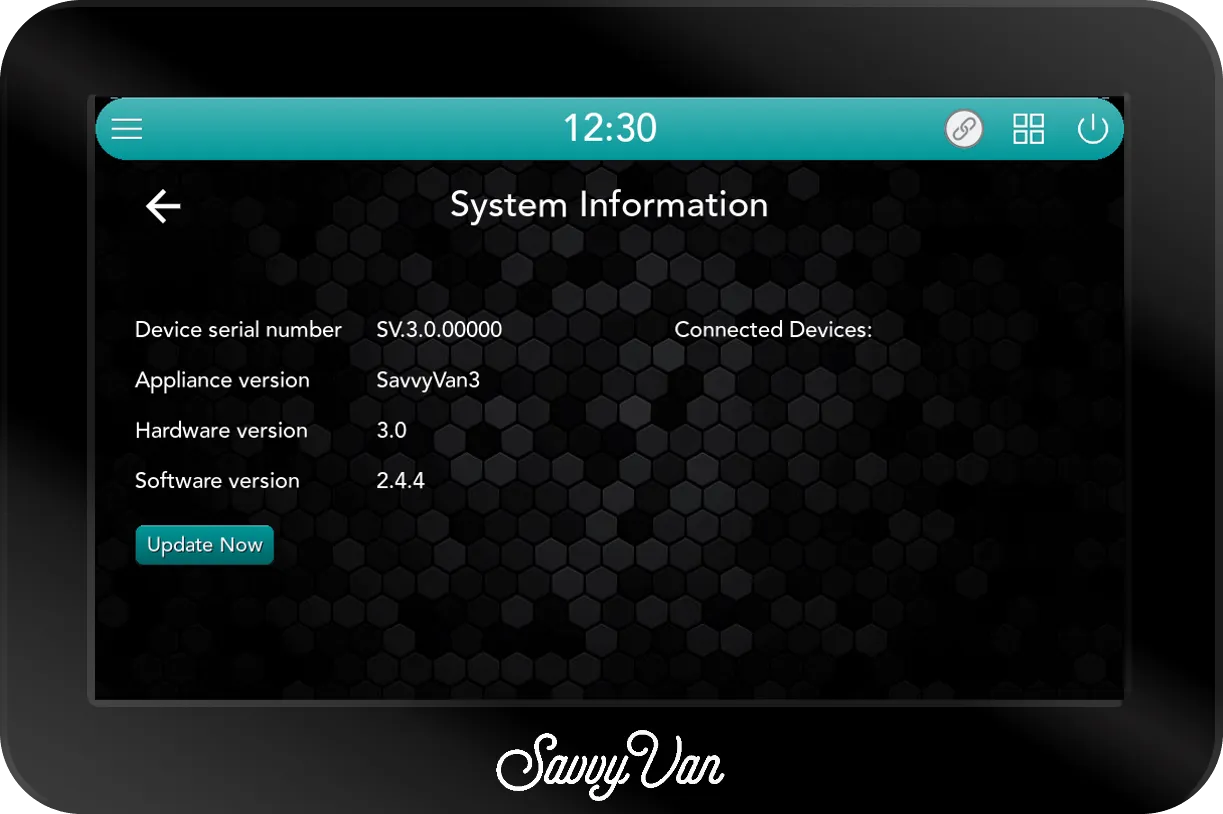
Every release is listed in the changelog, and we email about them if you have registered your device - which also adds a second year of warranty to your SavvyVan3, free.
Colours and sounds
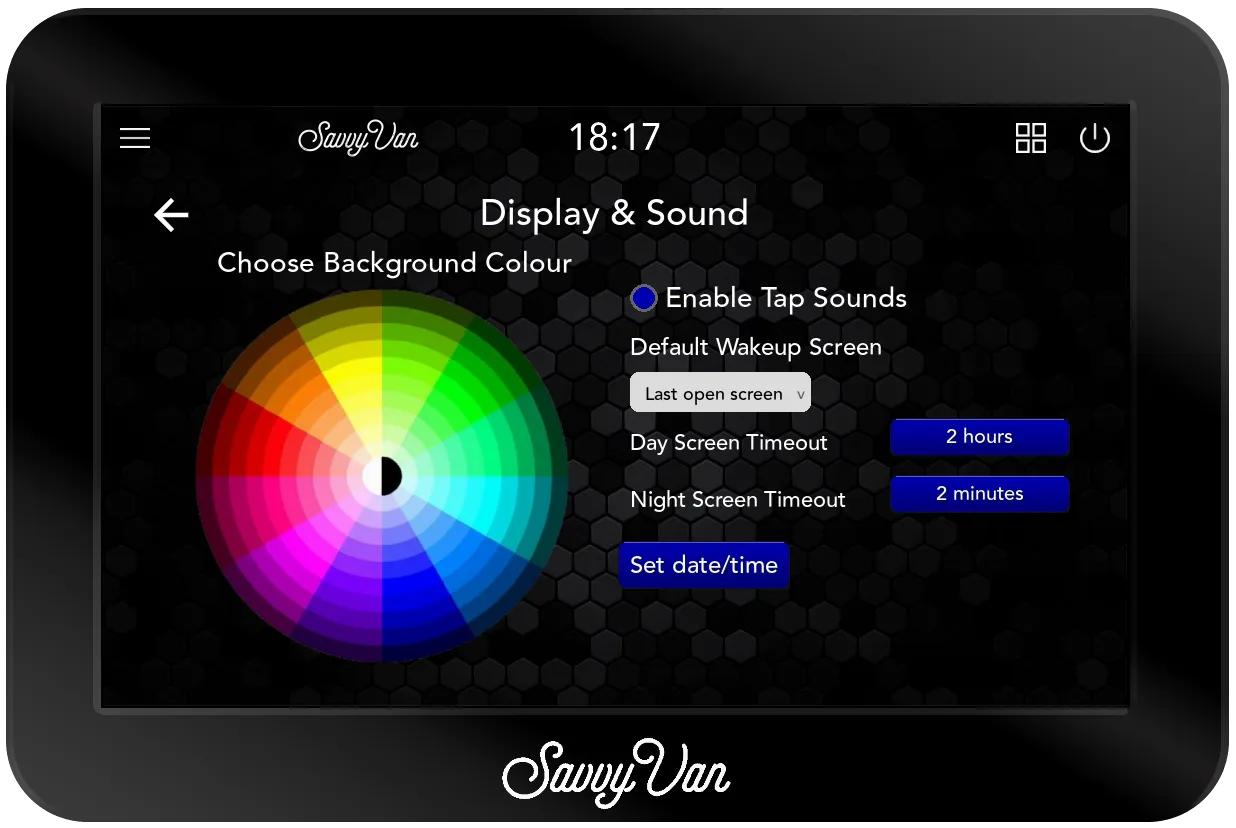
Settings → Display & Sound.
- Choose Background Colour - tap or drag on the wheel, and the panel changes colour as you go. It saves when you leave the page. A very dark colour turns the buttons grey, so they can still be seen.
- Enable Tap Sounds - a click on every tap, on or off.
- Default Wakeup Screen - what you see when you wake the screen. It starts on Last open screen, wherever you left it. Home always brings you back to the main screen, and Brand is the converter’s own page on a van with one. With a battery the panel reads directly, or with SavvyTanks, it can also wake straight onto Battery or Tanks.
- Day Screen Timeout and Night Screen Timeout - how long it waits before the screen sleeps. Tap one, choose Seconds, Minutes or Hours and set the number with - and + - or choose Never - then tap Save. See waking it up.
- Set date/time - only needed when the panel is offline. Set it with the arrows and tap Save. On WiFi the clock sets itself.
Notifications
Faults and warnings appear on screen for 30 seconds. Nothing is lost if you miss one: tap the menu top-left and choose Notifications for the full history.
The panel keeps the most recent 25, so the list stays readable rather than a wall to scroll through. Older ones drop off the bottom as new ones arrive.
Troubleshooting
WiFi is where most of the questions come from, so it has this section to itself. If the panel will not start at all, the installation guide has a start-up check that narrows it down.
If WiFi will not connect, or will not stay connected
The aerial is modest. It will not hold a connection at a distance a phone manages easily, and that is the cause of most WiFi trouble - not the network.
And the radio is not where you think it is. It lives in the control unit - the box behind the panelling - not the screen you are looking at. The two can be two metres apart, so good signal at the screen tells you nothing. The control unit’s case is plastic and blocks nothing; the van does, and so does wherever it was fitted - a locker, a bed base, behind foil-backed insulation.
Three things fix the great majority of it.
Use the 2.4GHz band. It carries further than 5GHz, and range matters more here than speed - the panel only needs enough for the time, the weather and an occasional update. If your router offers both under separate names, choose 2.4GHz.
Get the router closer to the control unit. Not the screen - the box. That usually means moving the router, since the control unit is bonded or screwed somewhere out of sight. A cupboard, a fridge or foil-backed insulation takes a surprising amount out of the signal.
Avoid networks that hand devices between access points. Mesh and multi-point setups share one name across several units and pass devices between them as you move about. The panel does not cope with being handed on and drops instead. Give it a network name belonging to one access point and let it stay there.
Using an iPhone hotspot
Common on the road, and it has two quirks worth knowing.
Turn on Maximise Compatibility. In iPhone settings, under Personal Hotspot. It puts the hotspot on the band the panel gets on best - the first thing to try if the hotspot appears in the list but will not connect.
Resetting the WiFi
When nothing will connect and you cannot see why, there is a Reset Wifi button at the foot of the saved networks list. It works in two stages, and only reaches the second if the first does not fix it.
Stage one clears the connection, not your networks. It restarts the wireless, bounces the adapter, then waits up to half a minute to see whether the internet comes back. Your saved networks and passwords are untouched. This fixes most cases, because most cases are a stuck connection rather than anything wrong with your settings.
Stage two is only offered if stage one fails. It erases every saved network and restarts the panel, leaving you to add yours again from scratch. The panel asks first, and says plainly what it is about to erase.
Start with the button and let it escalate. No reason to reach for stage two first - and if stage one works, you keep your networks.
On an older panel, without the reset button
Older software has no Reset Wifi button, so the same job is done by hand:
- Delete every saved network - the bin icon beside each one on the left. All of them, not just the one giving trouble.
- Restart the panel.
- Scan and add your network again.
Clearing one network and re-adding it is usually not enough; it is the full list plus the restart that resets things properly.
Updating the panel gets you the button, along with a WiFi page that shows signal strength while it scans and lets you search a long list of networks.
Warranty
Your SavvyVan3 carries a 12-month warranty, and registering it before that expires adds another 12 months, free. The second year is for the panel only: add-ons such as SavvyTanks or SavvyShunt carry the standard 12 months, and there is nothing to register for them.
Something not right? Tell us - and if you can, send the log files from the settings screen at the same time.
Questions people ask
- The screen has gone black. Is it broken?
- Almost certainly not. Between 8pm and 7am the screen sleeps after two minutes without a touch, while everything else keeps running. Touch it to wake it - it can take a second or two. If it will not wake at all, the installation guide has a start-up check that narrows it down in about a minute.
- Can I stop the screen turning itself off?
- Yes. Settings, then Display & Sound, has a day and a night screen timeout. Either can be set from a second up to a full day, or to Never. Bear in mind the screen is the thirstiest part of the panel, so leaving it on all night costs you battery.
- Can the panel show my starter battery as well?
- Yes, if a second battery has been connected to the panel. It shows as a second battery on the home screen, with a van drawn on it, under the first, and it gives a voltage rather than a percentage. Not there? Ask whoever fitted the panel whether your starter battery was connected.
- The panel will not connect to my WiFi.
- Usually signal rather than settings. Remember the radio is in the control unit rather than the screen, and those can be two metres apart - so it is the control unit that needs to hear the router. Use the 2.4GHz band for range, get the router closer to it, and avoid mesh networks that hand devices between access points. On an iPhone hotspot, turn on Maximise Compatibility.
- What does Reset Wifi do - will I lose my networks?
- Not at the first stage. It restarts the wireless and bounces the adapter, leaving your saved networks and passwords alone, and that fixes most cases. Only if that fails does it offer a second stage which erases every saved network and restarts the panel, and it asks first.
- My hotspot has an apostrophe in its name and will not connect.
- That was a real fault on older software - a name like "Simon’s iPhone" would not connect because of the apostrophe. It is fixed in current releases, so update the panel. Renaming the hotspot works around it in the meantime.
- Why is my clock wrong?
- The clock sets itself from the internet, so it needs WiFi. If the panel says Offline at the foot of the WiFi page, that is why.
- What is the passcode?
- 123456 for User Settings, unless it has been changed for your panel. If you bought the van or the panel second-hand, ask whoever fitted it.
- Can I change the colours?
- Yes - Settings, then Display & Sound. Tap the colour wheel to preview, and it saves as you leave the page.