
Installation guide
Fitting the motorised drain valve
A two-wire valve for the grey outlet. Put 12V across it and it opens; take the 12V away and it closes. Wire it through a SavvyTanks V3 relay and it opens from your grey tank on the tank page, or through one of the panel's own eight switches and it gets a tile of its own on the main screen.
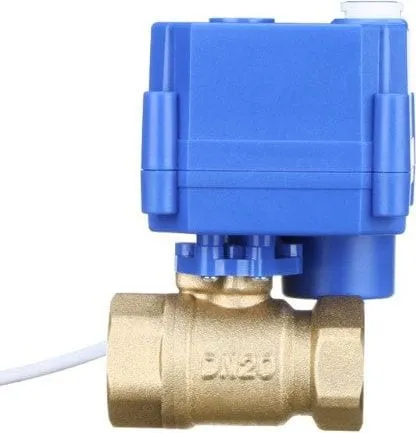
At a glance
- How it works
- 12V on opens it, 12V off closes it, in up to 5 seconds
- Wires
- Two - red is positive, black is negative
- Thread
- Three-quarter inch, female, at each end
- Switched by
- A SavvyTanks V3 relay, or one of the panel's eight switches
- Draws
- 150mA at most, so a 1A fuse is plenty
- If the power goes
- It closes
How it works
The valve has two wires - red is positive and black is negative - and it does exactly one thing with them. Put 12V across them and it opens. Take the 12V away and it closes by itself.
So all the panel has to do is switch that 12V on and off, and the valve is open for as long as the power is on. It takes up to five seconds to turn either way, and the motor switches itself off once the valve is fully open or fully closed.
It also fails safe. A capacitor inside keeps enough charge to close the valve, so if the fuse blows or the battery is isolated, it closes.
What you will need
- The valve. It has a three-quarter-inch female thread at each end.
- A fused 12V feed from your battery or fuse box. The valve draws 150mA at most, so a 1A fuse is plenty.
- Two-core cable long enough to reach from the valve to where you are switching it.
- Somewhere to switch it, which is one of these:
- a free relay on a SavvyTanks V3 module, or
- a free switch on the SavvyVan3 control board.
Either way it is opened from the screen - the only difference is where you tap. The two are compared under Choosing how to switch it.
Plumbing it in
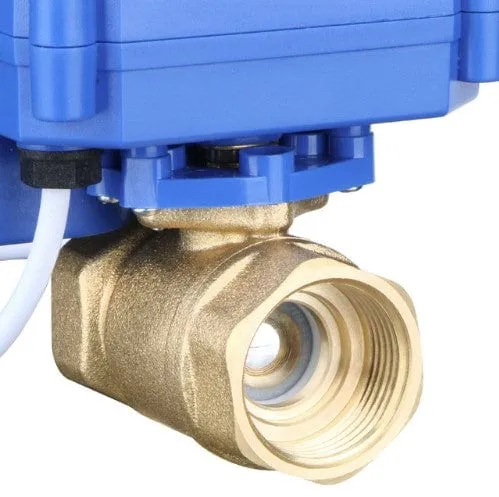
The valve is a serviceable part. It must be fitted where it can be reached and removed without dismantling fixed furniture or bonded panels. Beyond that, every van’s plumbing is different, so treat the steps below as good practice rather than hard rules.
- Choose a spot on the grey outlet where the valve can be reached later.
- Ideally, fit it with the blue motor housing on top, above the pipe rather than hanging underneath it, so any drips run away from the motor.
- Seal the threads - PTFE tape is the usual choice for a threaded water joint - and tighten on the brass body rather than on the motor.
- Run the cable back to where you will connect it, clear of anything hot or sharp.
Choosing how to switch it
| Through SavvyTanks V3 | Straight to the panel | |
|---|---|---|
| You open it from | Your grey tank, on the tank page | Its own tile on the main screen |
| Wired to | Relay 1 or 2 on the module | Any free switch on the control board |
| What gets switched | The valve’s black wire, its negative | The valve’s red wire, its positive |
| Best if | You have SavvyTanks showing your grey level | You do not have SavvyTanks, or want a tile |
Wiring it through SavvyTanks V3
The module has two relays, Relay1 and Relay2, each with two screw terminals and rated to 10A. A relay works by interrupting one wire passing through it, so here it sits in the valve’s black wire, its negative.
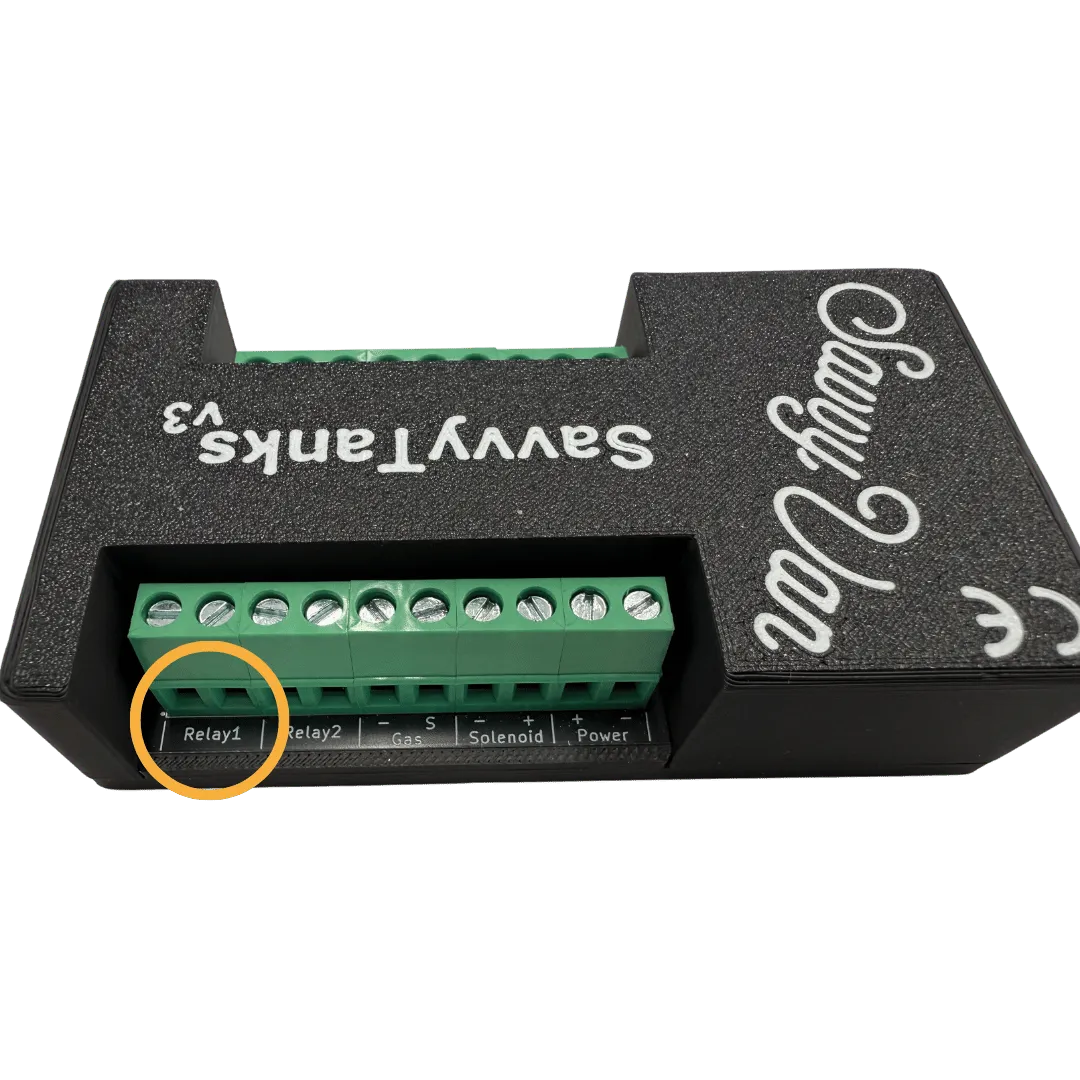
- Connect the valve’s red wire to a fused 12V feed.
- Connect the valve’s black wire to one terminal of Relay1 or Relay2.
- Connect the other terminal of that relay to ground.
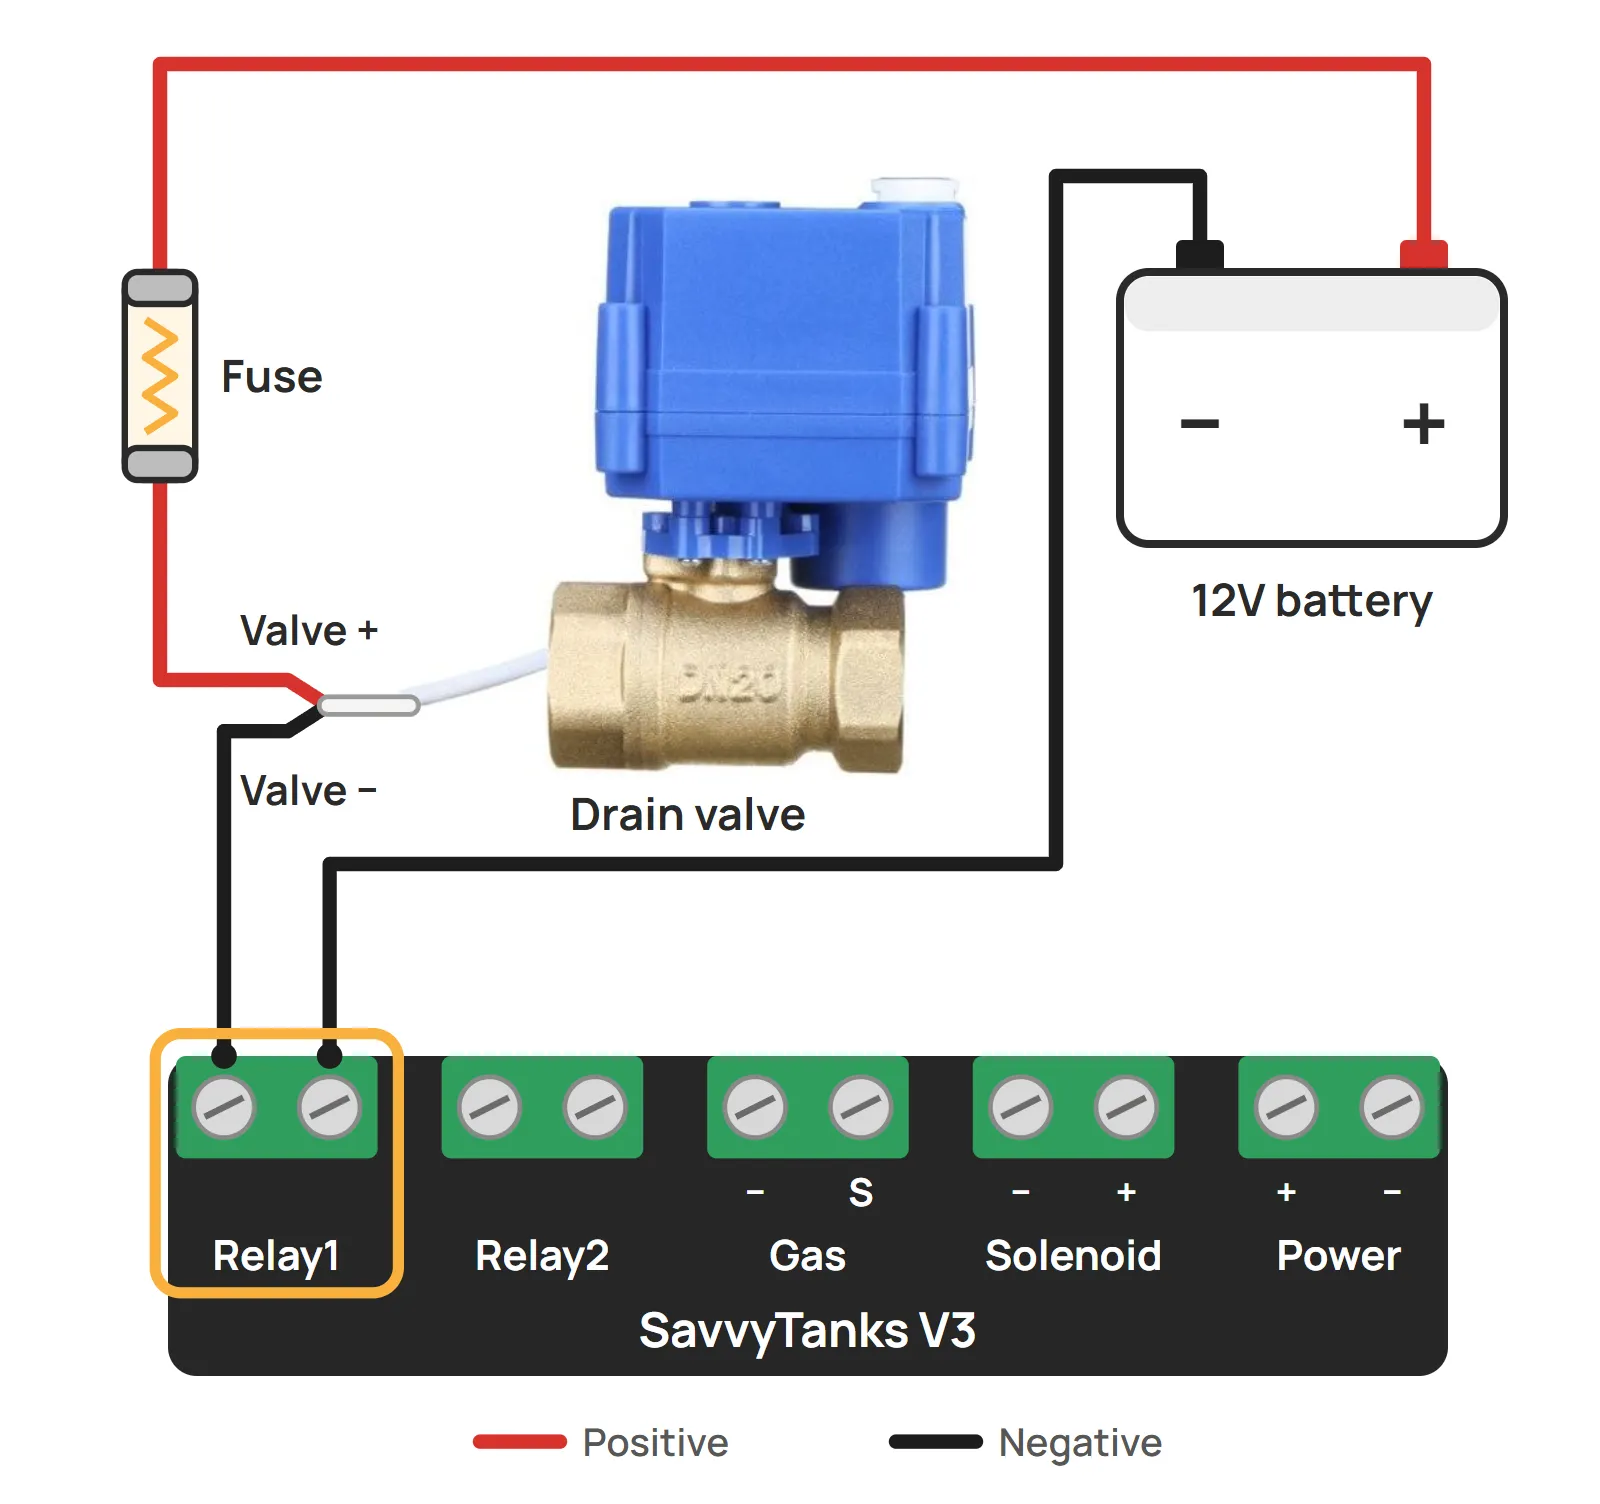
Then tell the panel which tank the valve belongs to. Go to Installer Settings → Tanks Settings, find your grey tank, and set its Relay to the number you wired - 1 or 2. That is what makes tapping the grey tank open the valve. A relay belongs to one tank, so choosing it for another clears it from the first. The rest of that page is covered in the SavvyVan3 installation guide.
Wiring it straight to the panel
Each of the control board’s eight switches carries up to 10A and has three terminals: COM, the feed in; NO, normally open, which is off until the panel switches it on; and NC, normally closed, which is the opposite. The valve uses COM and NO, and the switch sits in its red wire, its positive.
- Pick a free switch. On a standard SavvyVan3 all eight are yours. On a Sargent, CBE or BCA version the first few already run your van’s own circuits - use one from 5 to 8 (4 to 8 on CBE).
- Feed the switch. A fused 12V feed from the battery goes into COM.
- Switch to valve. From NO on the same switch, run a wire to the valve’s red wire.
- Valve to ground. The valve’s black wire goes straight to ground.
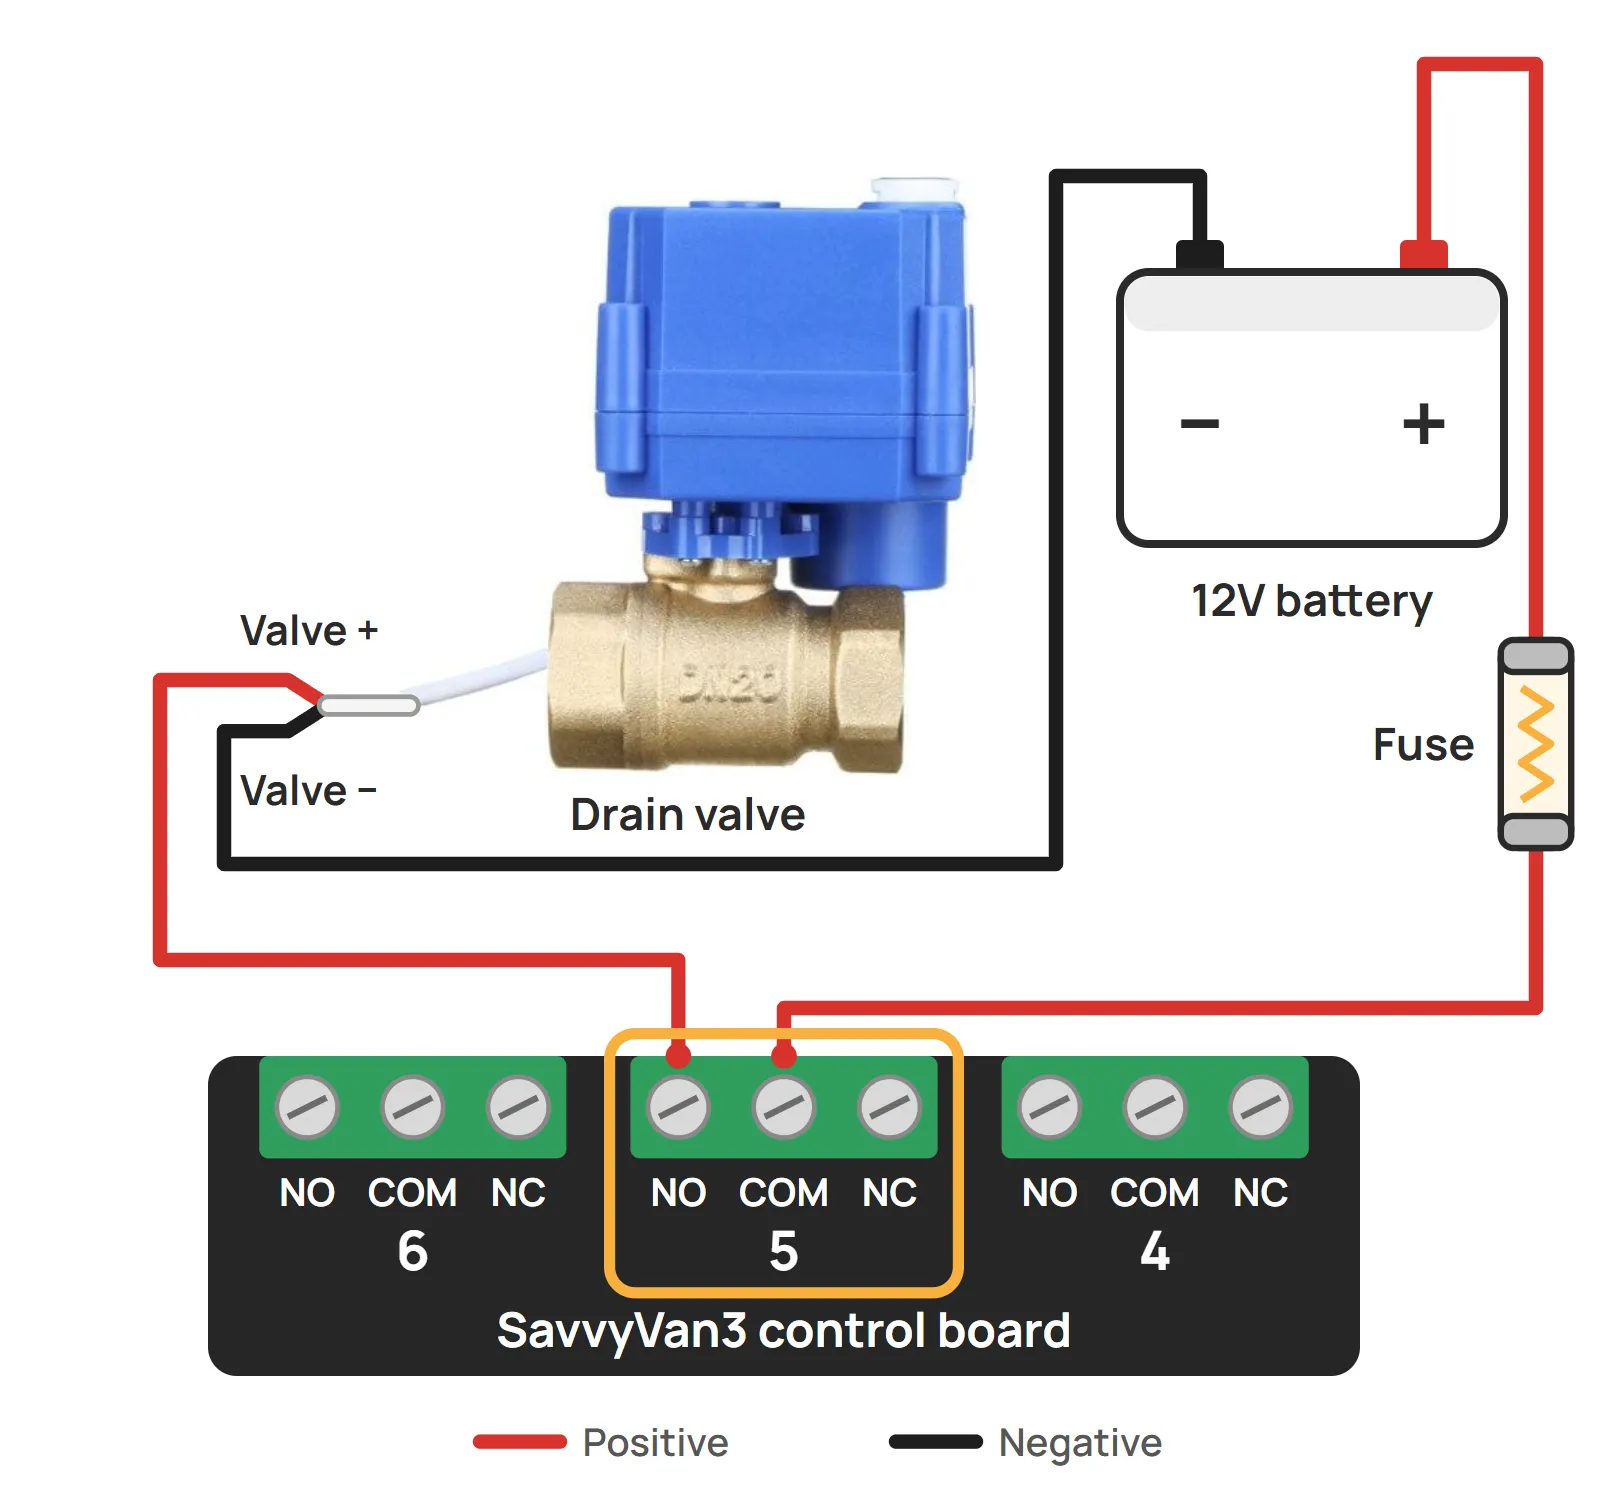
Then give it a tile. Switch 5 is tile 5, and so on.
- Go to Installer Settings → Tile Settings.
- Check the number of tiles reaches the switch you wired - tile 5 can only be selected once there are at least five.
- Select the tile with the same number as the switch.
- Tap the icon on the right and pick one for the valve. If nothing fits, type a name such as Grey drain into Add New Tile, choose an icon and tap Add - it then joins the picker like any other.
- Leave Advanced Options on None. Momentary would close the valve the moment you lifted your finger, long before the tank had emptied.
The tile settings are covered in full in the SavvyVan3 installation guide.
Using it
Park over a drain point, then:
- Through SavvyTanks - tap the tank icon on the main screen to open the tank page, then tap your grey tank. A red ring round it means its relay is on and the valve is open. Tap it again to close the valve.
- Straight to the panel - tap the valve’s tile to open it, and tap it again to close it.
It takes up to five seconds to open or close, so give it a moment before you look for water. Either way, the valve stays open until you close it, so remember to tap it again once the tank has emptied.
Troubleshooting
If it does not open
- Give it five seconds. It turns slowly, and that is normal.
- Check the fuse, and that there is 12V at the feed.
- Through SavvyTanks: check that the grey tank is enabled in Tanks Settings and that its Relay is the one you actually wired. A relay chosen against a different tank opens the valve from that tank instead.
- Straight to the panel: check that the tile number matches the switch terminals you wired, and that the valve is on NO and COM.
- Check the two wires at the valve are the right way round - red to the feed side, black to the ground side.
If it opens when it should not
- Straight to the panel: the valve is almost certainly on NC. Move it to NO. Invert, in Tile Settings, is not the fix - it changes how the tile is shown, not what the switch does.
- Through SavvyTanks: check which tank the relay is chosen against, in Tanks Settings.
If a joint drips
Take the joint apart, clean the threads, and seal them again. Hold the brass body with a spanner while you tighten, so the twist does not go through the motor housing.
Specification
| Supply | 12V |
| Wires | Two - red is positive, black is negative |
| Switching | 12V on opens it, 12V off closes it |
| Open or close time | Up to 5 seconds |
| Current | 150mA at most |
| Body | Brass, three-quarter-inch female thread at each end |
| Working pressure | Up to 1.0MPa (10 bar) |
| Manual override | None |
Questions people ask
- Does it stay open on its own?
- It stays open for as long as it has 12V, so it is open until you tap the tank or the tile again. The motor switches itself off once the valve is fully open, so it is not running all that time. Take the power away by any route - a tap, the fuse, the battery isolator - and it closes by itself.
- Can I open it by hand?
- No - it has no manual override, so it only opens while it has 12V across it.
- Do I need SavvyTanks to use it?
- No. SavvyTanks is one way to switch it, and the natural one if you already have SavvyTanks showing your grey level. The other is any free switch on the SavvyVan3 control board, which gives the valve a tile of its own and needs nothing else.
- Can I use a different valve?
- Yes, if it works the same way: two wires, opens when 12V is applied, and closes on its own when it is removed. Ours is the one we have tested. Keep it under 10A, which is the most a relay or a switch will carry.
- Is the valve covered by the warranty?
- Valves count as consumable parts, so they are not covered on their own unless a defect in materials or workmanship damaged them. Your statutory rights still apply if one fails early. The full terms are on the warranty page.