
Installation guide
Installing a SavvyVan 3.1
The SavvyVan 3.1 is the SavvyVan control board with every switched circuit fused and watched on the board, an emergency override for each circuit, and indicator lights of its own. It is what runs inside a SavvyCore, and it is sold to trade. This guide covers what is different about fitting and setting up a 3.1; everything else is exactly as on a SavvyVan3.
At a glance
- Sold to
- Trade only
- Supply
- 12V or 24V - no external fuses needed
- Size
- 139 x 233 x 24 mm
- Switched circuits
- Eight, each through its own blade fuse on the board
- Fuses fitted
- Four 10A, two 5A and two 2A - one for each circuit
- Fuse monitoring
- Every circuit's fuse, on the screen's Fuse Monitor - which opens by itself if the fuse on a switched-on circuit blows
- Emergency overrides
- Eight switches on top of the box, one for each circuit
- Starting it
- Press the power button - it never starts by itself
- Software
- 2.5.1 or later - the same software as SavvyVan3
- Everything else
- As the SavvyVan3 installation guide
What is the same as a SavvyVan3
The 3.1 runs the same SavvyVan software as a SavvyVan3, so almost everything is done exactly as the SavvyVan3 installation guide describes:
- Mounting the touch screen, and the two cables between the screen and the board.
- Temperature sensors and the second voltage input.
- First startup, WiFi and updating.
- Every page of Installer Settings - tiles, logic rules, pairing add-ons, battery, tanks, heater, lights, the SavvyDot, app, display and gestures.
What follows is what a 3.1 adds, and it is all you need beyond that guide.
In the box
The same as a SavvyVan3, with the SavvyVan 3.1 in place of the control board: the 5-inch or 7-inch touch screen, the SavvyVan 3.1, the 2m HDMI and USB cables, and a temperature sensor and mount.
Mounting it
The SavvyVan 3.1 measures 139 x 233 x 24 mm. Mount it as you would a SavvyVan3’s control board - somewhere it can be reached and removed without taking the van apart, ventilated and away from heat - with one more thing to allow for: its eight emergency override switches are on top of the box, so leave them where somebody can get to them.
Power, and the power button
The SavvyVan 3.1 runs on 12V or 24V, and it needs no external fuses - every circuit is fused on the board.
It never starts by itself. Press its power button to start it:
- the first time it has power;
- whenever its supply has been removed - the van isolated, the battery disconnected - and has come back;
- after it has switched itself off because its supply fell to 10V, which it does to protect the battery.
Tell the owner this when you hand the van over. A dark screen after the power has been off is the button waiting to be pressed, not a fault.
Check it is a 3.1
In Installer Settings, open System Information. Hardware version reads 3.1. If it reads 3.0 on a 3.1 board, the unit has not been set up as a 3.1, and the Fuse Monitor, the fuse settings and the onboard lights will not appear - get in touch before you go further.
A fuse on every circuit
Each of the eight switched circuits runs through its own blade fuse on the board, so every circuit is protected there. It comes with its eight fuses fitted - four 10A, two 5A and two 2A. Check that each circuit’s fuse suits what it runs, change it if not, and never go above the circuit’s 10A. A holder left empty is a circuit that cannot switch anything on, and the panel reads it as a blown fuse: switch that circuit on and the Fuse Monitor opens by itself, with its row reading Blown.
Tell the panel which fuse is where
So the Fuse Monitor can show the right fuse beside each circuit, record each one:
- Open Installer Settings → Tile Settings (the page is headed Tile Configuration).
- Select a tile. Under the tiles is a row the SavvyVan3 does not have: Fuse Amp Rating:.
- Choose the fuse fitted for that tile’s circuit - 1 A, 2 A, 3 A, 4 A, 5 A, 7.5 A or 10 A, or – for none set.
- Repeat for each tile. The choices are kept when you leave the page.
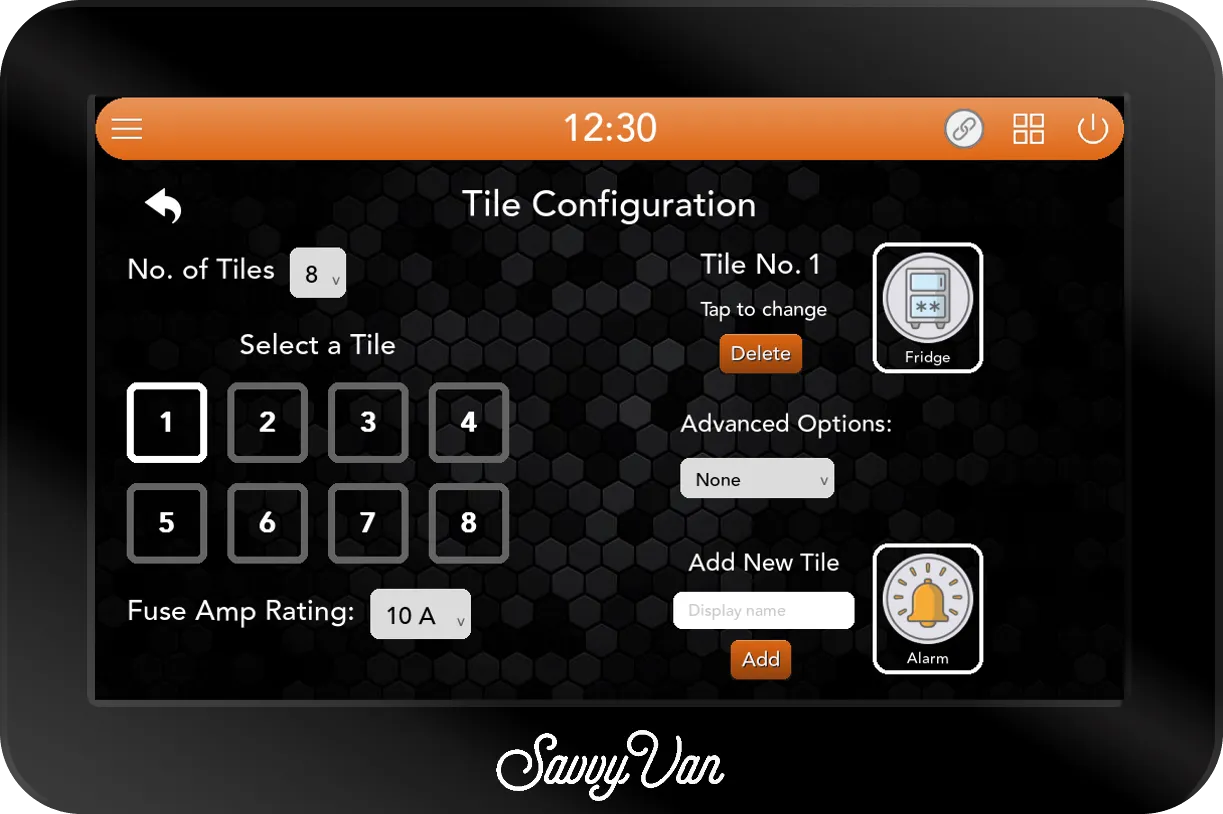
The rating only decides which fuse the Fuse Monitor draws; it does not change what the circuit can carry. The fuse in the holder does that.
The Fuse Monitor
On a 3.1 the side menu has a Fuse Monitor entry, for the owner as much as for you. It opens over the main screen and lists the eight circuits by their tile names, each with its fuse and whether it is intact:
- OK, green - the fuse is intact, checked with its circuit on.
- Blown, red - the fuse has gone.
- Unknown, grey - the panel could not read it.
- Unused - beyond the number of tiles in use.
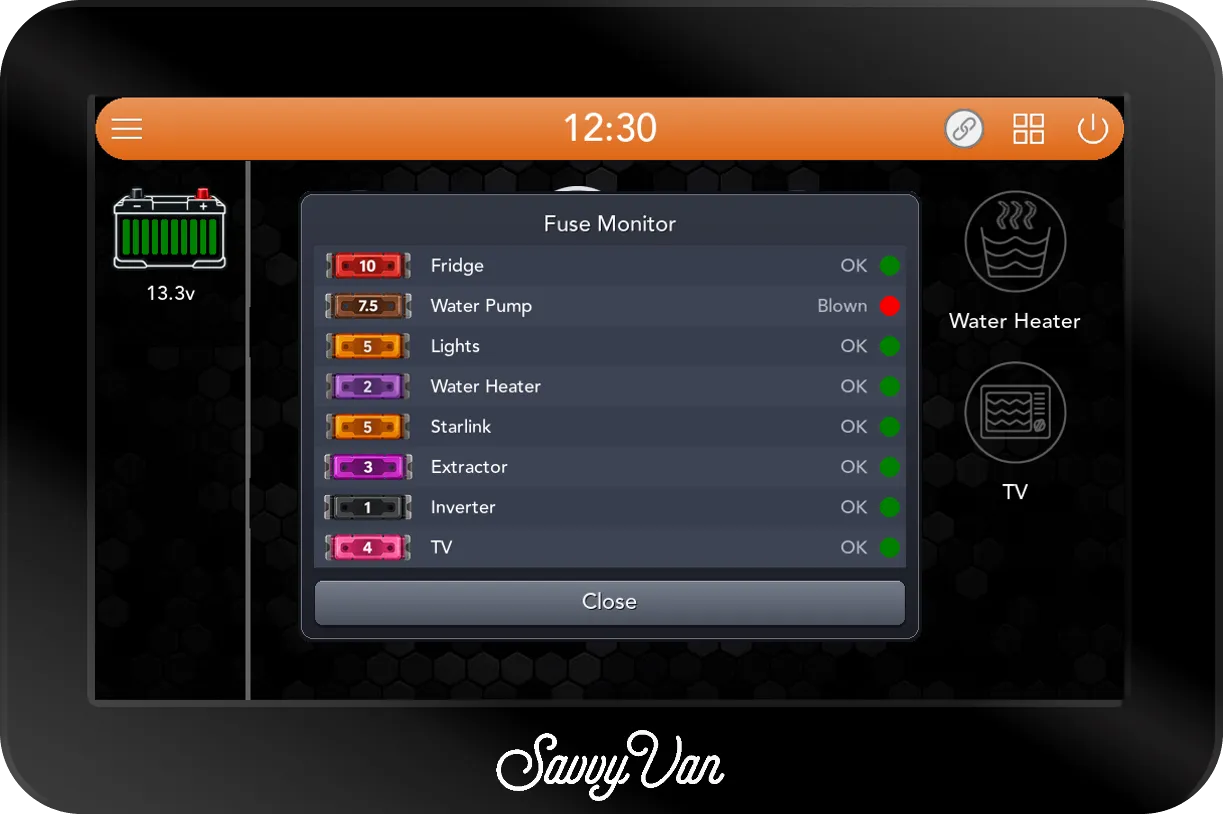
It checks that each fuse is intact rather than measuring the load. When the fuse on a circuit that is switched on blows, the screen wakes and the Fuse Monitor opens by itself over the main screen, with that row in red. The panel checks every few seconds, does not beep and puts nothing in Notifications. It opens once for each fuse: after Close, that fuse brings it back only once its circuit has been switched off and on again, or a new fuse has blown. A circuit that is switched off is never reported.
It checks a fuse with its circuit switched on, so when you have fitted and recorded the fuses, switch each circuit you use on with its load connected, open the monitor, and check its row reads OK.
Emergency overrides
There are eight override switches on top of the box, one for each circuit, so a circuit can still be switched on if the screen ever fails. An override switches a circuit on and cannot switch it off. Show the owner where they are, and tell them they are for when the screen is not working - not an everyday switch.
The onboard lights
The 3.1 board carries three indicator lights, which have nothing to do with the van’s own lighting. Installer Settings → Additional Settings → Onboard LEDs sets them: Off, White, Blue, or Wave - a slow fade from white to blue and back, which is how a new unit comes. They change as soon as you choose.
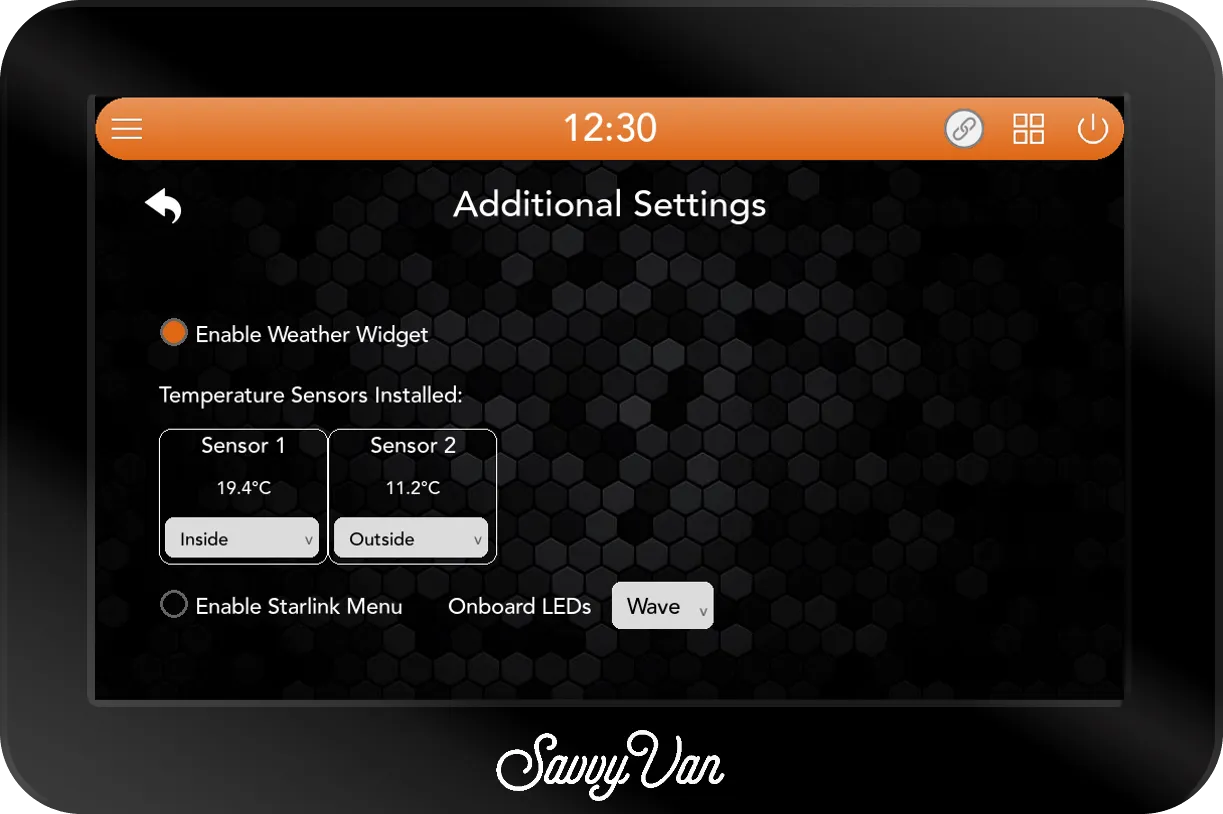
The lights show white from the moment the board has power until the software has started, whatever is set, and Wave holds white while the panel is busy
- starting up or updating - then fades again by itself. They do not react to anything else: not to faults, not to charging, and not to the screen going to sleep. If they should be dark, choose Off.
Troubleshooting
- The screen stays dark. Press the power button - the SavvyVan 3.1 waits for it whenever its power has been off, and after it has switched itself off at 10V. If it still does nothing, check the supply at the board.
- No Fuse Monitor in the side menu, and no Fuse Amp Rating row. Check Hardware version under System Information reads 3.1, and the software is 2.5.1 or later.
- The Fuse Monitor opened by itself. A fuse blew on a circuit that was switched on, or a circuit with an empty holder was switched on. Switch that circuit off, find out why the fuse blew, and fit a new one of the right rating before you switch it back on.
- Every row in the Fuse Monitor reads Unknown. The panel cannot read the fuses - get in touch.
- A circuit does nothing, and its fuse reads OK. Work through it as on a SavvyVan3: the tile, the wiring to the circuit, and what it powers.
Anything else is as the SavvyVan3 installation guide describes. Still stuck? Tell us what you are seeing, and send us the logs from the passcode screen - Get Help, then Send Logs.
Questions people ask
- Is a SavvyVan 3.1 set up differently from a SavvyVan3?
- Hardly. It runs the same software, with the same screens, add-ons, phone app and settings. The differences are the fuse on each circuit and the Fuse Monitor that watches them, an emergency override for each circuit, and its indicator lights - two settings in Installer Settings and one entry in the side menu.
- Why is the screen dark after the power has been off?
- The SavvyVan 3.1 never starts by itself. It waits for its power button the first time it has power, after its supply has been removed - an isolator, a disconnected battery - and after it has switched itself off because its supply fell to 10V. Press the button and it starts.
- What happens if a fuse blows?
- The circuit stops. If it was switched on, within a few seconds the screen wakes, goes to the main screen and opens the Fuse Monitor by itself, with that fuse showing Blown in red. There is no beep, and nothing goes to Notifications. It opens once for each fuse: after Close, that fuse brings it back only once its circuit has been switched off and on again, or a new fuse has blown. The Fuse Monitor is in the side menu whenever you want to look.
- Why does the Fuse Monitor say Unknown?
- The panel could not read the fuses. If every row says Unknown, get in touch - it usually means the fuse reading has not been switched on for that unit.